Welcome and thank you for your interest in Mobius, the world's most powerful live-looping software! If you already know what Mobius does, you may skip ahead to the Documentation section.
If you're still wondering what the heck is this "looping" thing is all about, Mobius essentially lets you to make live audio recordings and play them back in an endless loop. While a loop is playing you may add to it and modify it in many ways. One of the most common uses for a looper is to record background parts for "one man band" solo performers but this is just scratching the surface of what Mobius can do. If you would like more information on the history and evolution of looping techniques the Loopers Delight web site is the best place to explore and learn.
Mobius was inspired by many hardware and software loopers of the past and present, but most of its core features can be traced to the Gibson Echoplex Digital Pro (EDP) with Loop IV software. Though not technically an emulator, if you're familiar with the EDP you should feel at home. From a foundation of EDP features, Mobius adds multiple tracks, chromatic pitch and rate shifting, instant loop editing, scripting, and much more.
Be warned that Mobius is a complex program with an enormous number of options. Many people say that it is "too complicated", the user interface is "unpolished", and the documentation "sucks". All of these are true. If you are looking for a DL-4 emulator with photo realistic knobs you can just plug in and play then look elsewhere. If you are looking for a new musical instrument you can customize to work the way you want it to, then you've come to the right place. Just be prepared to do some reading and ask a lot of questions.
If you decide to take the plunge, we strongly recommend you join the Mobius Support Forums . This is where most Mobius discussion happens. You can also email us at jeff@circularlabs.com.
Mobius free because it is people like you that have helped make Mobius what is today. All we ask is that you report bugs and help diagnose them. You are also encouraged to send feature requests. We can't guarantee that we'll implement every request but just knowing what people want to do helps us make design decisions that may make those things possible in the future.
Thank you for helping us make Mobius better! I hope you enjoy it as much as we do.
Because Mobius is a complex application, the documentation has been broken up into several parts to make it easier to digest. The documentation is installed with the product and is also available on the web at the Mobius Document Index .
If you are new to Mobius, please read at least the Getting Started With Mobius manual before you begin. Then at least skim Exploring Mobius to become familiar with some of the more advanced features. The other manuals go into more depth on techniques and options, you won't need to read these right away but you should return to them once you become more comfortable with Mobius.
Read the sections Windows Installation or OS X Installation for the installation steps specific to your operating system.
If you are upgrading a previous installation, usually you just install the new version over the previous version, all of your previous configuration will be preserved.
While you can have more than one version of Mobius installed, this is not recommended. When Mobius runs, it reads configuration files from a directory that is shared by all installations on the machine. If you try to run Mobius binaries from an old version with newer configuration files, Mobius may not work properly. If you try to run new Mobius binaries with older configuration files, the files may be automatically upgraded and will no longer work with the binaries from the older version.
Mobius is supported on Windows XP, Vista and 7. It is not a native 64-bit application but it is known to work on 64-bit hardware.
Mobius is distributed as an executable installer. When you run the installer it will prompt you for an installation directory. The default is c:\Program Files\Mobius. The Mobius executables, initial configuration files, and example files will be placed in this directory.
The installer will also copy the Mobius VST plugin to the directory c:\Program Files\VstPlugins which is the most common directory for VST plugins. If you are using a different plugin directory you must manually copy the MobiusVst.dll file from the installation directory to your plugin directory.
NOTE: If you decide to move Mobius to a different directory after installation you must reinstall, you cannot simply move or rename the directory. During installation an entry in the Windows registry is created that contains the path to the installation directory. Moving or renaming this directory will not update this registry entry, you must run the installer again to update the registry. If the Mobius UI is blank or displays a lot of question marks, it usually means that the registry does not point to the correct installation directory.
All of your custom configuration settings are stored in the installation directory in two files: mobius.xml and ui.xml. Unlike other applications, customizations are not stored in the Documents and Settings directory for your user account. This means that if you delete the installation directory you will lose your customizations.
If you wish to reinstall or upgrade, do not run the uninstaller or delete the current installation directory. Just install into the same directory that was used by the previous installation. All of your customizations will be preserved.
Mobius is supported on OS X 10.4 or later. It is a universal binary that will run on both PPC and Intel machines.
Mobius is distributed as a disk image (dmg) file. After downloading it will normally mount automatically and contain a single folder named Mobius. To install simply drag this folder into the Applications folder. After copying, open the folder and click on the Mobius icon which looks like a blue glass sphere.
When Mobius is run for the first time, it creates this directory to hold various editable configuration files:
The primary configuration files mobius.xml and ui.xml are stored here. This is also commonly used for user written scripts.
If you wish to use the Audio Unit plugin you must manually copy folder Mobius.component from the installation directory to one of these directories:
To use the VST plugin you must manually copy the Mobius.vst folder from the installation directory to one of these directories:
To install a new version of Mobius you simply delete or rename the existing Mobius folder before copying the new one. You cannot copy an upgrade folder into an existing Mobius folder, you must replace the existing folder. Since the configuration files are stored in an different folder, customizations will not be lost during an upgrade.
While it is possible to have more than one version of Mobius in the Applications folder this is not recommended. Since the Mobius configuration files are always stored in the /Library/Application Support folder, they may not be compatible with all of the Mobius releases you have in your Applications folder.
Even if you intend to use Mobius as a VST or Audio Units plugin, it is recommended that you start using it as a standalone application. Plugin host applications add a another layer of complexity to the setup process, when you are just getting started it can be difficult to tell whether a problem is caused by Mobius or the host application. There are also some user interface customizations that can only be performed in the standalone Mobius window. Once standalone Mobius has been configured and is working properly, you can advance to using the plugin. The Mobius Plugin section discusses this in more detail.
To run standalone Mobius you must configure audio devices, this is described in the Audio Device Configuration section.
Most people will also want to configure one or more MIDI devices such as footswitches or control surfaces. This is described in the MIDI Device Configuration section.
On Windows, you run Mobius by selecting the Mobius item with the blue orb icon from the start menu, or by running mobius.exe from the command line.
On OS X, you run Mobius by clicking the application icon from the Mobius folder inside the Applications folder.
After running Mobius you should be greeted with a window that looks similar to this:
Using standalone Mobius requires the selection of an audio device. If you do not select a device you can still do things like arranging and resizing the user interface or creating function bindings, but Mobius can't be used for looping. Pressing buttons in the UI or sending MIDI commands will have no effect, Mobius will appear to be frozen.
When you select an audio device it is important to choose one with low latency. Latency is a complex topic covered in more detail in the Tuning Latency section. For now you can think of it as the amount of time it takes to get an audio signal from an input channel of an audio device, through the computer, and back to an output channel of an audio device. Mobius can compensate for latency in some cases so it is still quite usable regardless of which device you choose. But with high latency devices you may hear "skips" or "lag" in the sound when you do certain things.
To get low latency you will usually have to buy an aftermarket audio interface rather than using the one that came bundled with your computer. External Firewire or USB interfaces are recommended. If you have a laptop, PCMCIA cards can work well. There are many choices in aftermarket audio interfaces, some work better than others. You will need to do some research and ask questions on forums to find the one that works best for you. But generally speaking the so called "integrated" audio interfaces that came with the computer do not perform well. They can be fine when you're just getting started but if you want to use Mobius for serious live performance, almost everyone buys a professional audio interface.
To configure an audio device, start standalone Mobius, open the Configuration menu and select the Audio Devices item.
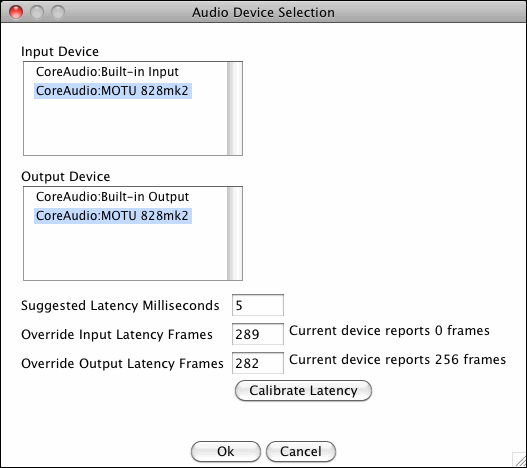
If you use OS X, you will see two selection panels, one labeled Input Device and one labeled Output Device. Normally you select the same device for both input and output but this is not required. On OS X you are always using a Core Audio device driver which will usually have low latency.
|
| OS X Audio Device Configuration Window |
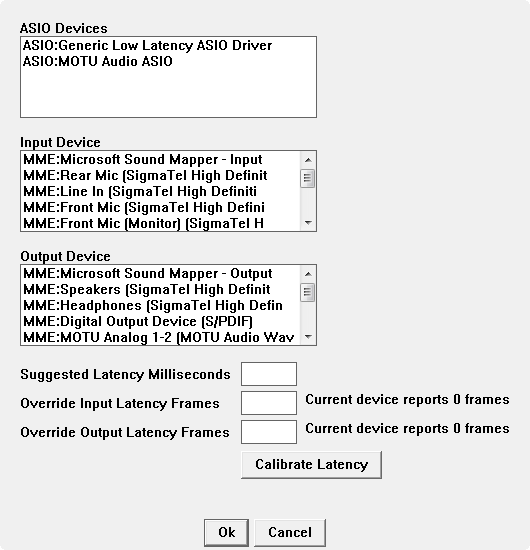
If you use Windows, life is a bit more complicated. There are three selection panels, one labeled ASIO Devices, one labeled Input Device and one labeled Output Device. You should always select an ASIO device if one is available as these have the lowest latency. An ASIO device will provide both inputs and outputs so you only need to make one selection.
 |
| PC Audio Device Configuration Window |
If you do not have any ASIO devices on Windows, you may select an MME device. You must select one device from the Input Device panel and one device from the Output Device panel. If you have more than one audio device, normally you will select the same one for both input and output. MME devices tend to have very high latency, they are fine for exploring Mobius features but are not recommended for serious use.
At the bottom of the dialog you will see a set of fields with labels Suggested Latency Milliseconds, Override Input Latency Frames, and Override Output Latency Frames. Leave all of these fields empty. Do not press the Calibrate Latency button. Once Mobius is configured and working properly, read the Tuning Latency section for more information about optimizing latency for your system.
Once you have selected an audio device click the Ok button to close the window.
Connect an instrument or microphone to the input channels of the audio device. Mobius operates in stereo so it always uses audio device channels in stereo pairs called "ports". By default Mobius always uses the first input and output port. If you have an audio interface with more than one pair of stereo channels, Port 1 is usually channels 1 and 2, port 2 would be channels 3 and 4 etc.
Check the level meters on the audio interface to make sure that a signal from your instrument is being received. External Firewire and USB devices usually have a software "mixer" application, make sure the fader levels on all channels have been raised.
Run Mobius and play something on your instrument. In the center of the Mobius window is a thin rectangle called the audio meter you should see it flicker as you play your instrument. If you do not see any movement in the Mobius window try connecting your instrument to a different set of input channels on the audio interface. If your interface has channels on both the front and back, it may be unclear which ones are 1 and 2. If you've tried sending a signal through all of the devices inputs and you still see nothing flickering in the Mobius window, post a message on the forum and we will try to help.
If you see that lovely audio meter flicker, click the button labeled Record at the top of the Mobius window. You should see some numbers in the center of the window changing. Play something on your instrument, then click the Record button again. What you recorded should start playing back in an endless loop. If you don't hear anything, make sure you have speakers or headphones connected to the first pair of output channels on your audio device. If you have a device with multiple channels try connecting speakers to all of the other channels. If you still don't hear anything, post a message on the forum.
If you hear your first loop playing, congratulations! If you hear some "clicks" or "pops" while the loop is playing there are two common explanations. The first is that the instrument level is too high and you are having digital "clipping". Try lowering the instrument level and try again. Clicks can also happen when the default latency setting for your audio device is too low. Read the Tuning Latency section to learn how to raise the latency.
NOTE: One common error when setting up a software looper is having the audio output of the looper feed back into the input. For example, it is common to have several sound sources connected to a mixer, then have the mixer output connected to the input of the audio device. If the output of the audio device is also connected to the mixer, you can have feedback. When Mobius is overdubbing, anything that is currently playing may then be included in the overdub (with a slight delay). The loop will become increasingly louder and sound "metallic".
If the output of the audio device is connected directly to the speakers this should not be a problem. If you are using a mixer, you will have to find a way to exclude the channel containing the audio device output from the "bus" being sent to the audio device input. If you are familiar with Mackie mixers, Mute Alt 3-4 combined with Control Room Source buttons can accomplish this nicely.
While you can control Mobius using the computer keyboard or clicking buttons in the window, most people control Mobius with a MIDI device such as a footswitch or a control surface. Footswitches are widely used because they allow the musician to keep both hands on their instrument. Control surfaces with rows of faders and knobs are very convenient for setting track levels and adjusting feedback.
Mobius can also send messages to other devices using MIDI. The most common use for this is to send MIDI clock pulses to a drum machine or sequencer so that drum patterns or pre-recorded accompaniment tracks can be played in sync with the Mobius loop.
You can use any device that sends MIDI commands to control Mobius. Many newer MIDI devices will connect to the computer though a USB port. For devices that only support connection with a MIDI cable, you will also need to buy a MIDI interface for your computer. See the MIDI Device Recommendations section for more information on buying MIDI interfaces and devices.
 |
| MIDI Device Configuration Window |
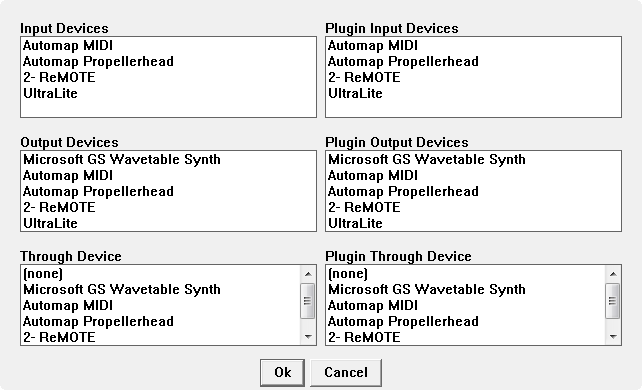
To configure MIDI devices open the Configuration menu and select the MIDI Devices item. There are two columns of device selection panels, the panels on the left select devices to be used when Mobius runs as a standalone application, the panels on the right select devices to be used when Mobius runs as a plugin. If you have MIDI devices that connect directly to the computer using a USB cable, the names you see should be similar to the name of the device like "Korg nanoKontrol". If you have MIDI devices that connect with MIDI cables to an external MIDI interface, the names you see will be usually be numbered port names like "Some Device Port 1", "Some Device Port 2", etc. When using MIDI interfaces make sure you select the same port that your MIDI device is connected to.
When selecting devices it is important to select only the ones that you really need. You can select as many input devices as you want, but if Mobius will only be receiving commands from one of them it will waste time looking at messages from the others. If you run Mobius as a plugin, it is very important that you only select devices that are not also being opened by the host application. If both Mobius and the host try to use the same device this can cause problems like commands being performed twice, and in some cases even crashes. Selecting MIDI devices for the Mobius plugin is rare, you usually let the host manage the MIDI devices and have it route MIDI into and out of the plugin. This is discussed in more detail in the Mobius Plugin section.
Input Devices are selected if you want to receive MIDI commands to control Mobius. When you run Mobius standalone you almost always select at least one input device. When you run Mobius as a plugin you almost never select an input device. Instead you let the plugin host manage the MIDI devices and you let the host route MIDI into and out of Mobius.
Output Devices are selected if you want Mobius to send messages to another hardware device or plugin. The most common use for this is to send MIDI clock pulses to a drum machine or sequencer. Using scripts it is also possible to send any MIDI message to another device to do things like changing patches or triggering samples. If you are running Mobius as a plugin, selecting an output device is common in one special case: sending MIDI sync pulses through a "loopback" device to control the tempo of the host application. This is discussed in more detail in the Mobius Plugin section. If you are not intending to send MIDI pulses to another device or to the host application, you normally will not select an output device.
Through Devices are selected if you want to send a copy of the MIDI message received from the input devices to other devices. This is relatively uncommon, but you might want to use this if the footswitch can send commands to both Mobius and something else, and you don't have a MIDI splitter. All MIDI messages received by the input devices are simply sent immediately to all the through devices.
First determine whether you need a MIDI interface. You will need a MIDI interface if you want to control Mobius using a footswitch, keyboard, or other MIDI device that can only connect with MIDI cables. You will also need a MIDI interface if you want to send MIDI commands to a drum machine or other device that can only be connected with MIDI cables. If all of the devices you want to use can connect directly to the computer with USB cables, then you do not need a MIDI interface.
If you do need a MIDI interface, there many relatively inexpensive ones available. Unlike audio interfaces, MIDI interfaces are not very complicated and almost anything from a reputable brand will work fine. The simplest interfaces will little more than a cable with a pair of MIDI in/out connectors on one side, a USB connector on the other and a "lump" in the middle. Larger interfaces will support more than one input and output port. If you only need to use the MIDI interface with Mobius a simple "1 by 1" interface is enough. Popular brands include M-Audio, E-MU, and MOTU. Before you by a MIDI interface though, check to see if your audio interface also includes one. Many audio interfaces also include a 1x1 MIDI interface.
Probably the most asked question regarding MIDI devices is "what's the best MIDI footswitch"? Unfortunately there isn't a very large selection of MIDI footswitches and most are rather expensive. By far the most popular MIDI footswitch used with Mobius is the Behringer FCB-1010. In many ways it is the ideal footswitch: it sends note on and off messages, it has "banks" so you can assign up to 100 Mobius commands to switches, and it has two integrated expression pedals to control track level and feedback, and at $150 USD it is among the least expensive footswitches available. The problem many people have with it is that it is large. It takes up a lot of floor space and dragging it to gigs can be inconvenient. There are smaller footswitches available but most of them cost several times more. If you are new to MIDI and are unsure of what would be best for you post a message to the forum and we'll try to help.
When you look for footswitches there are two important things to consider: does it support "momentary" switches and does it support "banks". A momentary switch is one that sends a MIDI message when you press it and also when you release it. Some switches will send note messages (Note On when pressed Note Off when released) and some will send continuous control messages (CC greater than zero when pressed and CC zero when released), both of these types can be used with Mobius. While you can do basic looping without momentary switches, if you want to use some of the more advanced features like "sustain functions" or "long press behavior" you will need momentary switches. Many of the cheapest footswitches were designed for keyboard players to select patches and they only send MIDI program change messages. Switches that only send program changes are not momentary.
The concept of "banks" is common but manufacturers call it by different names. A bank is basically a set of MIDI messages assigned to each switch and different banks can cause the switches to send different MIDI messages. For example bank 0 of the popular FCB-1010 might send MIDI note numbers 0 through 9, bank 1 would send note numbers 10 through 11, etc. Banks are important because there are literally hundreds of things in Mobius that could be assigned to a MIDI message. With footswitches that don't have banks, you will be limited to a small number of things you can control with your feet. Footswitches that support banks typically have a set of "up" and "down" switches to scroll through the banks. The FCB-1010 has 10 banks of 10 switches allowing you to send 100 different Mobius commands.
There are other footswitches that work great with Mobius and are relatively small such as the GORDIUS Little Giant and the Rocktron All Access. Unfortunately they are several times more expensive than the FCB-1010, but if money is less important than size, definitely check those out.
A control surface is typically a device that tries to emulate a mixer track strip, usually with a fader and one or more rotary knobs for each track. While we don't think these are as essential as a footswitch, they are very nice for adjusting Mobius track output levels, input levels, pan, and feedback. There are many choices here that vary greatly in size and features. The Korg Nano series are inexpensive and small. The Novation Remote series combines a control surface with a keyboard which is handy for chromatic pitch shifting. Behringer, Mackie, M-Audio and AKAI all make interesting control surfaces. If you aren't sure what you need we recommend you first spend some time learning what you can do with Mobius tracks, then look for the controller that meets your needs. As usual, forums are a good source for reviews and advice.
It is also possible to control most Mobius functions using the computer keyboard. The keys are "momentary" switches so they can be used for sustain functions and long-press behavior. If you're exploring Mobius for the first time and aren't sure if you want to invest money in a footswitch, a cheap alternative is to buy any USB keyboard, pry most of the keys off, then step on the ones that remain. This is obviously not a very durable option for live performance, but it does work.
Mobius also supports the Open Sound Control (OSC) protocol, with default support for the TouchOSC application that runs in the Apple iPhone and iTouch devices. This is an advanced topic that is not yet fully documented. If you are interested in OSC post a message on the forums or send me email.
On Windows, Mobius may be used as a VST plugin. On OS X Mobius may be used as either a VST plugin or an Audio Units plugin. Be sure to read the Installation section and make sure the plugin files have been copied to a place that will be seen by your host application.
Host applications vary widely in how they deal with plugins. Even hosts that operate in similar ways may use different terminology when talking about plugins. This makes it difficult to write a comprehensive document on using the Mobius plugin. We will give you some general guidelines and go into some detail on a few popular hosts, but it is simply not possible to document how to use Mobius in every host application. If you have never used a plugin with your host before, try starting with a simple plugin like a digital delay or soft synth to become familiar which using plugins in your host.
Mobius is an unusual plugin. Most plugins fit into one of two categories, they are either effects or synths. Typical effects plugins are compressors, filters, and reverbs. They receive audio, and send out processed audio, and they don't support MIDI control. A synth plugin normally receives MIDI events, sends out audio, but does not receive audio for processing.
Mobius is like a combination of an effect and a synth. It needs to receive and send audio like an effect, but it also needs to receive MIDI events like a synth. Many hosts, particularly older DAWs, have trouble with this. They either can't support the dual nature of the Mobius plugin, or they require complicated configuration to make the necessary connections.
Mobius is also unusual in that it supports 16 input and output channels or "pins". The vast majority of effects plugins only support a single set of stereo input and output channels. Some hosts will simply refuse to load Mobius because it has more than 2 channels. Others will load it but will only let you access the first 2 channels.
Some hosts do not let effects plugins have direct access to MIDI devices. Instead they control plugins only through "parameter automation". In this style of host, the plugin advertises a set of parameters that may be controlled by the host. The host then allows the user to set up associations between MIDI events and these parameters. In this situation, you have to configure the Mobius functions and parameters to make available to the host. Then you do all of your MIDI mappings in the host. While this works it can be difficult to set up, and the host may not support parameters that behave like "momentary buttons" which will prevent you from using some Mobius features.
Then there is synchronization. Mobius is also unusual in that it tries to provide synchronization of loop recording with the host's transport controls if it has them. Unfortunately hosts differ radically in how they implement the horrible VST specification, so trying to get synchronization to work on a new host is almost always a problem.
If this is starting to sound scary, unfortunately it is. There are several popular hosts that work well for Mobius and we try to support them whenever they have a new release. But we simply cannot guarantee that Mobius will work with every host out there, and we don't have the resources to even try. If you have a problem with your favorite host and are willing to spend some time with us to diagnose them, we may be able to work with you. But otherwise you will have to consider one of the recommended hosts.
In our experience, plugin hosts come in roughly four varieties.
The Recorder style is familiar to most people. These are the traditional DAWs that have a user interface organized like a multi-track tape recorder. Examples of this style include Cockos Reaper, Cakewalk Sonar, Steinberg Cubase, and Apple Logic. They excel at recording, mixing, and non real-time editing. While they are widely known they are not always good hosts for Mobius. They often have a hard time dealing with effects that need both MIDI and audio inputs and they may not support plugins that have many channels. Generally they are designed for studio use rather than real-time performance. We try to make an effort to support Reaper and Logic, support for the others will be spotty.
The Arranger style is usually designed more for live performance. Here the focus is on arranging pre-recorded samples or recording short samples of a fixed length and applying effects to them in real time. Examples of this style include Ableton Live, Sony ACID, Apple Garage Band, and FL Studio. These often have many of the same problems as the Recorder-style hosts but they can be better. Of these, Ableton Live is an outstanding host for Mobius and is actively supported.
The Rack hosts attempt to simulate a hardware rack of effects and synths and most do not provide audio recording and editing. They are oriented toward "always on" plugins that are constantly responding to MIDI and audio in real time. Examples of this style include Apple Mainstage, Audiofile Engineering RAX, and Brainspawn Forte. These can be good hosts for Mobius but they are relatively unusual among the current user base so support may be spotty. Of these, we actively support Apple Mainstage.
The Modular hosts typically present a user interface that uses pictures to represent plugins and other devices, and lets you draw "wires" to connect them. Examples of this style include Plogue Bidule, AudioMulch, Usine, and Max/MSP. Modular hosts are well suited for Mobius because they make it easy to visualize all of the input and output channels and make connections to them. They excel at creating "patches" combining effects and synths controlled by MIDI. They typically are not as easy to use for traditional linear audio and MIDI recording and editing. We use and recommend Bidule and AudioMulch.
On Windows the installer will copy the Mobius VST plugin to the directory c:\Program Files\VstPlugins which is the most common directory for VST plugins. If your host can be configured to load plugins from more than one directory, make sure VstPlugins is on the list. If the host must load plugins from a different directory you must manually copy the MobiusVst.dll file from the installation directory to your plugin directory. You only need to copy that one .dll file, leave all the other files in the installation directory.
Once the plugin files have been copied to the proper directory, the Mobius plugin should appear in the host application. Where this appears will be different in every host. The VST plugin may be named either "Mobius" or "MobiusVst". The AU plugin should be named "Mobius". Some hosts organize plugins by the manufacturer name so there may be an item named "Circular Labs" you need to expand to see the plugin. If you do not see the plugin you may need to ask the host to "rescan" the plugin directory.
If your host has the concept of tracks and you have a choice between inserting Mobius in an audio track or a MIDI track, you usually want to insert it in an audio track, then arrange to have MIDI routed to that track.
Some hosts may refuse to load plugins that have more than one pair of stereo input and output channels, by default Mobius has 8 pairs of stereo channels. If the host will not the insert the Mobius plugin, try reducing the number of channels.
Run standalone Mobius, bring up the Global Parameters dialog, select the Limits tab and find the parameter named Plugin Ports. Change this parameter value to 1, click Ok, and close standalone Mobius. Now run the host application again, ask it to rescan plugins, and try inserting the Mobius plugin. Whether this works or not please post a message with your results on the forums or send us email. We are interested in compiling a list of those hosts that require this workaround.
If the host does support multi-channel plugins then you have the option of having each Mobius track receive from and send to different channels. Mobius organizes channels into stereo pairs called "ports". Each track may be configured to have one input port and one output port.
Assigning tracks to ports provides several useful performance options, such as having some tracks take input from a soft-synth rather than live audio. You may also insert a different effects plugin after the output of each track, making each track sound different even though they are driven by the same input signal.
This is described in more detail in the Track Setups section of the Getting Started manual.
Unlike most VST plugins, Mobius by default opens two windows when running under a Microsoft operating system. The first is a small window containing the Mobius icon and the text Click to open Mobius window. The second is the main Mobius window.
The first small window is the normal "editor" window created by the VST host. Most plugins put all of their user interface in this window. This window does however have some limitations for Mobius users. First, the window cannot be resized so if you change the layout of the Mobius user interface it may not be possible to display everything. A more serious limitation is that computer keyboard key events are often not passed along to he plugins so you cannot use the keyboard to control Mobius.
Because of these limitations, by default Mobius opens a second window over which it has complete control. This window may be resized and will receive keyboard events just like the standalone Mobius window. If you close the main window, the VST editor window will remain open, simply click anywhere inside the editor window to reopen the main window. If you close the editor window, both windows will be closed.
Some people prefer to have Mobius put the user interface into to the VST editor window. This is possible if you are willing to live with the limitations. Bring up the Global Parameters dialog, find the parameter named Dual Plugin Edit Window, and uncheck the checkbox. Close the both the Mobius main window and the editor window and ask the host to reopen the editor window. You may need to restart the host application for this change to take effect.
We have had reports of crashes using single window mode with some hosts. The causes for this are unclear, but if you are experiencing crashes using the plugin in single window mode, try enabling dual window mode.
Dual window mode cannot be enabled in the Mac Audio Unit plugin.
Dual window mode may be enabled in the Mac VST plugin but it is not the default.
Mobius normally receives MIDI events directly from the VST host so it is not usually necessary to select MIDI input or output devices for the plugin. If at all possible you should try to arrange to let the host manage the MIDI devices and route MIDI events into Mobius.
There are two special circumstances where you might want the Mobius plugin to open it's own MIDI devices:
The first case used to be rare and only seen on very old hosts, but it is unfortunately becoming more common in modern hosts like Mainstage. The philosophy coming into vogue is that plugins shouldn't have to know anything at all about MIDI, they should get all of their control signals through plugin parameters. It is then the hosts job to associate a MIDI event with each plugin parameter. This works fine for your typical effects plugin with a dozen or so parameters, but Mobius literally has hundreds of parameters. Further some Mobius features like pitch and rate shift are meant to be controlled using MIDI notes like a synthesizer.
It is possible to control almost everything using plugin parameters if necessary, this is described in the Plugin Parameters section. But depending on the host it may be more convenient just to let Mobius open a private MIDI device connected directly to your footswitch or control surface. To select a MIDI input device open the MIDI Devices dialog and find the device selector labeled Plugin Input Devices. Select the device that is connected to your MIDI controller.
Note that some hosts may already be in control of the devices you select in Mobius, this can cause conflicts and in some cases crashes. If you select a MIDI device for the Mobius plugin you should configure the host so that it does not open the same device. Usually there will be a dialog where you can pick which MIDI input and output devices the host will use. Unfortunately some hosts simply open every available MIDI device.
The other common reason to have the plugin open a MIDI device is to send master MIDI clocks to the host. Plugins cannot normally be the sync master for the host, but this is possible if the plugin can generate MIDI clocks sent to a "loopback" device. This is discussed in more detail in the Synchronization section of the Getting Started manual.
While it is possible to select a Plugin Through Device in the MIDI Devices window, we are not aware of an interesting use for this. If you find one let us know!
Most plugins support parameters which can be controlled by the host. Common examples are output level, delay time, or filter curve. Some hosts support parameter automation where a sequence of parameter values can be programmed to change in time with an audio or MIDI track.
Mobius is unusual because it has hundreds of parameters. These include the continuous controls like Input Level and Pan, preset parameters like Loop Count and Quantize, and functions like Record and Reset. Each of these parameters can be further scoped to a particular track or track group.
Because most hosts do not deal well with plugins that have more than a few dozen parameters, you must explicitly select the parameters to expose to the host. The default set of plugin parameters is:
You may declare additional parameters in the Plugin Parameters dialog from the Configuration menu. The Plugin Parameter Bindings section of the Exploring Mobius manual has more information on configuring plugin parameters.
As mentioned in the Plugin MIDI Devices section, some hosts only allow plugins to be controlled through parameters, direct access to MIDI events is not possible. For these hosts you can either configure Mobius to open a private MIDI device, or you can declare all of the functions you want to use as plugin parameters, and associate them with MIDI events in the host.
Binding MIDI events with plugin parameters is complex and different in every host. If you are not familiar with this process, the best thing to do is post questions on the forum.
Most VST plugins support the notion of a "programs" or "patches" which are selectable from a open menu in the editor window. Mobius does not support the VST patch menu. Changing Mobius operating behavior is done through popup menus in the main Mobius user interface.
It is important to note that when a plugin is bypassed that no audio is "flowing" through the plugin. Without a steady stream of audio flowing through the plugin the Mobius user interface will appear to be hung. If you need to silence the Mobius plugin yet still have it be responsive to keyboard or MIDI commands, you will need to use Mobius functions such as Reset or Mute rather than bypassing the plugin.
If you are processing the audio signal from your instrument through an effects plugin before sending it into Mobius, it is common to want to monitor your signal "through the computer" rather than with a "side chain bus". Monitoring your instrument while you loop is a complex topic that will not be explored fully here. The main thing to understand is that if you play something on your instrument, you see the Mobius input level meter flickering, but you don't hear anything, you may need to enable input monitoring in Mobius.
Bring up the Global Parameters dialog and find the parameter named Monitor Audio Input. Check the checkbox and click Ok. If you can now hear your instrument then you are monitoring "through the computer". This means that you will hear the effects that all the plugins in the chain, including Mobius, are having on your signal. This is a perfectly fine way to monitor but it has consequences, primarily that you may hear a latency delay between the time you do something on your instrument and you hear the processed sound.
The alternative is to use some form of side chain monitoring, typically this is done with a hardware mixer outside the computer or with audio interfaces that support "zero latency monitoring".
If your instrument is a MIDI controller, or if you are guitar player using an amp modeling plugin then you have little choice but to monitor through the computer since it is the plugins that are defining the sound of the instrument you want to monitor. If you are using external hardware go generate the sound you want to monitor, it is best to do side chain monitoring to avoid the latency delay.
Something to be aware of is that when you have the Monitor Audio Input option checked, the sound you are hearing might have a "metallic" quality that sounds like "flanging". If you hear this it often means that there is some form of chain monitoring active that is being combined with the through-the-computer monitoring. Because the through-the-computer signal will be slightly delayed, when combined with the side chain it will sound very much like a flanging effect is being applied. In this case you either need to disable the side chain monitoring, or uncheck Monitor Audio Input.
Also when you monitor through the computer, you normally want to disable Mobius latency compensation. Rather than have Mobius do the compensation, you are already compensating mentally by adjusting your playing technique by playing slightly "ahead". The reasons for this are complicated and discussed more in the Tuning Latency section.
Audio devices selected for Mobius in standalone mode will not be opened when running as a VST. The VST host must open the audio devices and route them to Mobius.
The input and output latency override values are however still used when Mobius runs as a plugin. When you are just getting started and intend to use Mobius primarily as a plugin, it is recommended that you do not set latency overrides and instead let the host give Mobius the input and output latency.
If you do want to switch between plugin and standalone Mobius you will want to configure Mobius to use the same buffer size as you use in the plugin host application so the latency overrides will match.
Unfortunately because Mobius configures latency using milliseconds rather than buffer sizes it can be difficult to know how Mobius latency compares to the host. As a general rule, a buffer size of 256 is the same as 5 milliseconds. So a buffer size of 512 would correspond to 10 milliseconds, 128 would correspond to 2 milliseconds, etc.
Again, it is best initially to simply make sure that the two latency override values are empty or set to zero. Latency calibration is covered in more detail in the Tuning Latency section.
Latency compensation is a complex topic and we recommend that you not be obsessed with it when you are just getting started. If you are using an ASIO or Core Audio device driver, latency is so small that many people don't even notice it. For those new to looping, timing problems with the loop start and end points or the alignment of overdubs are more often due to footswitch technique than latency.
If you feel you need to fine tune latency compensation you can go through the calibration process described in this section. Typically people use the latency calibration dialog to find the starting values, then manually tweak latency overrides by ear until they sound right.
A common misconception is that latency is a fixed quality of a particular audio interface. If you buy audio interface X you will have low latency, but audio interface Z will have high latency. The brand of audio interface certainly has an effect on latency but there are many other factors that determine the minimum latency you can achieve. These include the speed of the CPU, the amount of memory, the firewire chipset, shared memory in the graphics card, wireless network adapters, and the other software you have running. Latency isn't something you can just add up based on your hardware and software. It is something you tune to be as small as possible without causing audio distortion.
Tuning latency is similar to finding the maximum comfortable operating speed of a car. It may be possible to drive your car at 120 MPH but it may be noisy and hard to control at that speed. Setting latency too low is like driving a car too fast. You are putting demands on the computer that it may not be able to meet reliably. Raising latency is like slowing down your car, it may take longer to do some things but you'll arrive safely.
The consequence of having latency too low is that you will "miss an interrupt" or have "buffer underrun". The audio device is constantly asking the computer for little blocks of audio to play. If the computer cannot respond in time the audio interface will leave a gap in the digital audio stream, this will sound like a harsh "click" or "pop". Raising latency gives the computer more time to respond to requests from the audio device so these audible glitches don't happen.
Because looping is to a large degree delayed playback of previously recorded material, latency is actually much less of an issue than in an application like a virtual instrument. Latency is noticeable whenever an abrupt change in playback occurs, such as ending the initial recording, and unquantized functions such as loop switch, loop trigger, or trim. If you are "quantizing" functions, you may not hear any glitches because quantizing will delay the function long enough that we can compensate for latency.
When you make an abrupt change, say a loop switch, Mobius will already have buffered some frames from the current loop. We can start buffering frames from the next loop, but they will be delayed a few milliseconds while we play the frames that are already in the buffer. What output latency compensation does is begin buffering the next loop not from the first frame, but at an offset equal to the number of frames from the old loop that are already buffered. The bad effect is that a small portion of the front of the next loop will be skipped. The good effect is that when the next loop finally becomes audible, it will be at its proper playback position, the same position it would be in if there were zero latency. This is important if you are playing rhythmically and want the rhythm to be maintained during the switch. Without this there would be a few milliseconds of "extra time" inserted whenever you switch that is likely to annoy your drummer.
When you are quantizing, Mobius is usually able to anticipate where the change in output buffering needs to occur so that the switch occurs seamlessly without loss. This early buffering of the next loop can cause an audible glitch if you cancel the switch (or change the target loop) very close to the point where the switch is scheduled. If we have already started buffering the next loop, a few milliseconds of it will still be heard before hearing the correct loop. In practice this should be a relatively rare problem as most people don't change their mind about which loop to trigger a few milliseconds before the trigger is to be performed.
Latency compensation must also be performed to ensure that overdubs are aligned properly with the audio that was being heard during the overdub. Without compensation the overdub may sound slightly ahead of or slightly behind where it should be.
Mobius uses information returned by the device to estimate the amount of latency compensation to be performed. This can be calculated with reasonable accuracy by knowing the number and size of the buffers used by the audio device driver. But there are other factors besides buffer size that contribute to latency, so sometimes the estimate is not correct and latency must be adjustment manually.
At the bottom of the Audio Devices... dialog, there are two fields labeled Override Input Latency Frames and Override Output Latency Frames. After you select a device and reopen the dialog, the default latency adjustment values are shown to the right of these fields. If you enter a number into either field, it will override the default value.
The easiest way to determine what these values should be is to perform a calibration. Click the Calibrate Latency button and another dialog will popup with information about the calibration process. In order to calibrate, you must physically connect the left or right output channel of the sound card to the left input channel of the same card. For most cards this can be done with a cable that has mini-plugs on both ends. If the sound card output is being sent to a mixer, you probably have a way to connect the output to the input in the mixer. This is called a loop back connection.
Once you have made a loop back connection, click the Start button on the calibration dialog. If you are monitoring the sound card's output, you will hear a series of clicks. If the loop back connection is not correct, after about 10 seconds a message dialog will popup saying that calibration timed out waiting for an input signal. If this happens check your connections and try the calibration again. If the calibration was successful, a message dialog will pop up displaying the total measured latency, and the recommended values for input and output latency frames. Click the Accept button to copy these values into the latency fields of the Audio Devices dialog, or click Cancel to keep the current values.
If you want to tweak the latency values manually, start by increasing the values for both latencies by 10 until it sounds right. You normally shouldn't have to add more than a few hundred frames. If it is still way out of alignment, stop adding to the input latency and start making more radical adjustments to the output latency, up or down in increments of 500. If that is required, submit a bug report with information about your computer and sound card.
To get a better understanding of what these values mean, you can think that at any moment in time Mobius is receiving sound that was performed a few milliseconds in the past, and is playing sound that will be heard a few milliseconds in the future. Input latency is the number of frames it takes a sound to "get into" Mobius. If you set input latency too low, you will be recording sound that was performed before the time you triggered the record function. If you set input latency too high, you will lose some of the sound immediately after you triggered the record function. It is more critical that input latency be correct because miscalibration can result in unwanted sound or loss of sound at the record start point. If an overdub sounds like it has the right content but isn't aligned properly, then adjust output latency not input latency.
If you set output latency too low, overdubs will sound like they are playing too late. If output latency is too high, overdubs will sound like they are playing too early. Deliberately adjusting output latency too low can actually be useful to compensate for monitoring latency. If you perform live using monitor speakers some distance away, it will take a noticeable amount of time for the sound to travel from the speakers to your ears. If you are overdubbing to this sound, it may not be aligned properly on playback. Raising output latency can help bring the overdubs back into alignment.
If you have been able to install and configure Mobius and record your first loop, proceed to the Getting Started manual for more depth on the user interface and an introduction to the most common looping functions.