
This manual will help you quickly get started doing basic looping with Mobius. We will introduce some of the major concepts and terms, describe the user interface, and give examples of some of the most common ways to use Mobius. You are expected to have read the Installation Guide and completed a successful installation test.
Once you have finished this manual, Exploring Mobius will give you more information about how Mobius can be controlled and customized.
The Mobius Techniques manual has detailed information and tutorials for some of the major looping techniques.
The Mobius Reference manual will have an exhaustive description of every function, parameter, control and variable. You can skim this to get a feel for what is available, but normally you should read this last.
The Mobius Scripting manual will have all the details about how to write and use Mobius scripts. Most users will want to use scripts at some point but it is recommended that you first become comfortable with basic Mobius use.
Mobius is a complex application and it is difficult to talk about it without using some peculiar jargon. In this section we will introduce some of the fundamental concepts and terminology that you will see throughout the documentation. You should read this section before you read anything else. Don't feel like you need to fully understand everything right away, just read through it and remember the terms so that when you see them later you can return here for review.
A channel is a stream of digital audio samples. Channels correspond to the physical inputs and outputs of your audio interface, or to the "pins" in the VST or AU plugin. Mobius is continually receiving audio from two or more channels and continually sending audio out to two or more channels.
A port is a collection of adjacent channels. Mobius always processes digital audio in stereo, so it organizes channels into stereo pairs, one for the left channel and one for the right. These pairs of channels are called ports. If for example you have an audio interface with 8 input channels, channels 1 and 2 will be port 1, channels 3 and 4 will be port 2, and so on.
Mobius does not currently support ports with more than two channels, such a the 6 channels necessary for 5.1 surround. This may be addressed in future releases.
A frame is the* smallest unit of digital audio that Mobius will use. Frames consist of a set of samples of digital audio, captured at a moment in time from one Port. Currently Mobius always processes audio in stereo, so a frame always contains two samples, one for the left channel and one for the right.
Most of the time you can think of a frame and a sample as the same thing. It is a single slice of audio, whether it be mono, stereo, or surround. So what is commonly called "sample rate" is really "frame rate" in Mobius.
A loop can be thought of as one as one independent digital audio recording. Loops are typically allowed to play from beginning to end then repeat indefinitely, but you can use loops in other ways. Loops may be of any length and contain audio from any port. After a loop has been recorded you may add more audio by overdubbing. A loop may be altered in many ways using Functions. Loops can be made to evolve over time using Feedback.
While you can think of a loop as one digital audio recording, it may actually be built from several pieces known as layers. When you record a loop for the first time it will have one layer. Every time you modify the loop with Overdub or some other loop editing function, a new layer is created. Layers are the history of the loop and you can change which layer is currently playing.
The most common use for layers is to undo a change you don't want. For example, if you're overdubbing new audio and you play a wrong note, you can delete the current layer and return to the previous layer.
A cycle is a subdivision of the loop. Loops initially will contain only one cycle, but through various operations such as Multiply additional cycles may be added. Cycles are always the same length. Cycles are sometimes the same as measures in music notation, but not always.
Cycles are primarily of interest for Quantization.
A subcycle is a subdivision of a Cycle. The number of subcycles in a cycle is defined by a Parameter that can be changed at any time. Subcycles are sometimes the same as beats in music notation, but not always.
Subcycles are primarily of interest for Quantization.
A track contains a set of loops with controls that determine how the loops are recorded and played. Mobius tracks are similar to tracks in other audio applications. All tracks can be playing at the same time and can be mixed together using traditional controls like output level and pan.
If you are familiar with looping hardware you can think of each track as one hardware looper that can be used independently and mixed together.
Tracks can contain several loops but only one loop can be playing at a time. This is called the active loop. Changing loops in a track is called Loop Switching.
The loops in a track can be of any length but most of the time various Synchronization methods are used to create loops that are exact multiples of each other so that they are rhythmically compatible.
A loop switch is the act of changing the loop that is currently playing within a track. This is an important event because there are many options available to control when the switch happens and what happens to the new loop after it is activated.
Synchronization is a very complex topic but in general it refers to techniques that can be used to create loops with precise control over their size. This is important if you want to create loops that play together with a consistent rhythm.
It is practically impossible to create loops in different tracks that are exactly the same size by just tapping the start and end with a footswitch. They may be close but there will always be a few milliseconds of difference and the loops will gradually go out of phase if you let them play long enough.
If you wish to create loops in different tracks that will play together without drifting apart, you will always want to use some form of synchronization.
A function is a named action performed by Mobius at the request of the user. Examples include Record, Overdub, and Reset. Causing a function to be performed is called executing the function.
Mobius provides many functions, some like Record will be used frequently, others are used only is special situations. We will introduce the most commonly used functions in this manual, the rest will be discussed in the Reference Manual .
The behavior of a function may be altered by setting Parameters
Functions may be combined in complex ways using Scripts
A mode is a temporary state that a track can be in. Modes are usually caused by Functions. Some functions take effect immediately and are then finished. Other functions have both a start and an end time. Functions that have both a start and end time are called modal functions. While the function is active the track is in a mode. The current mode is displayed in the user interface.
The most common example is Record mode. When the Record function starts the track enters Record mode, when it ends the track enters another mode, usually the Play mode.
While you are in a mode, functions may have different behavior. A function that does one thing when in Reset mode may have a different behavior when in Switch Quantize mode. This will be discussed in the detailed documentation for each function.
An event is an action Mobius performs at a certain time in the future. Events are scheduled during the execution of a function. A function may schedule more than one event.
In the user interface, events are displayed on a timeline so you can see what will be happening as the loop plays.
Each track has its on list of scheduled events.
The most common use for events is to perform a quantized function.
Quantization causes the execution of functions to happen at a precise time. When quantization is disabled functions are executed immediately. When quantization is enabled, the execution of the function will be delayed until the next quantization boundary. Quantization is frequently used to build loops that have a regular rhythmic quality.
The three quantization boundaries are Loop, Cycle, and Subcycle.
You will see several phrases used in the documentation to describe the effects of quantization, such as "when quantizing", "during quantization", or "quantized function". All of these refer to the same concept.
A script is a text file containing statements in a programming language that allows you control Mobius in very complex ways. In the simplest case scripts can be used as "macros" to perform a set of functions at exactly the same time. In more complex cases scripts can use conditional logic to adjust their behavior depending on what is currently happening.
Scripting is a complex topic that will be covered in detail in the Mobius Scripting manual. For now you can think of scripts as a way to extend and customize the built-in Mobius functions. You don't need to understanding scripting right away, but most people will eventually use them.
A parameter is named value that can be changed to control how Mobius behaves. There are three categories of parameters: global parameters, track parameters and preset parameters.
Global parameters control general operating characteristics such as whether input monitoring is enabled, or the amount of latency compensation. Global parameters are usually set in a popup window opened by the Global Parameters item from the Configuration menu.
Preset parameters change the way functions are performed, examples include Record Threshold, Quantize Mode, and Sync Mode. Most of the time when we talk about parameters we're referring to preset parameters. Preset parameters are usually set in a popup window opened by the Presets item from the Configuration menu.
Track parameters control a few characteristics of each track such as the track name, group number, and input focus. These are relatively unusual and are used mostly in scripts.
Parameters have a type which determines how they are shown in the UI and used in scripts.
A preset is a named collection of parameter values. While you can change parameters individually using MIDI or scripts, you will usually change parameters in bulk by selecting presets.
You may need only one preset, or you may define several with parameters chosen for different looping styles. Each track has an active preset that may be changed at any time, even while a loop is playing. Each track may have a different active preset.
A control is a named value that controls how audio is recorded and played in a track. Controls are similar to Parameters but their values are always integers and they have a larger range than most parameters. They are usually set by a MIDI device that sends continuous controller messages such as a rotating knob or a foot pedal.
There are five built-in controls: Input Level, Output Level, Feedback, Secondary Feedback, and Pan. See the Using Controls section for more information.
A setup is a named collection of parameters, presets, and controls for all tracks. You may define several setups to configure tracks in different ways.
There is always one active setup. Setups may be changed at any time, even while loops are playing.
There are many ways to use setups, but usually they are designed with a particular performance piece in mind. You can name each track to indicate which instruments will be used in them, define a level and pan mix for those instruments, and decide which preset to use in each track.
A project is a complete snapshot of Mobius state. It includes the current Setup plus the current control settings for each track which may be different than the setup. It also includes all the audio content: tracks, loops, and layers. Once a project has been saved it may be loaded back into Mobius at a later time.
Projects are not saved as a single file on the file system, there is a project directory file contain all the non-audio information, plus one or more audio files for each loop. The audio files are stored as standard wave files and may be loaded into other music applications.
A trigger is an external stimulus that causes Mobius to do something. There are several types of trigger:
While Mobius supports all of these trigger types, by far the most common trigger is a MIDI foot controller, which are often called footswitches. Because of this, you will see phrases like "tap the Record switch" or "press Reset" in the documentation. Just remember that while we usually talk about MIDI footswitches, you can also do the same thing with other triggers.
A sustainable trigger causes Mobius to take action twice, once when the trigger is pressed or turns on and another when the trigger is released or turns off. The sustainability of a trigger is important if you want to use Sustain Functions or Long Press functions.
The following triggers are usually sustainable:
With UI buttons, Mobius is notified when the mouse button is pressed and when it is released. Similarly with computer keyboard keys, Mobius is notified when the key is pressed and released.
With MIDI notes, Mobius expects to receive a NOTE ON message when the key (or footswitch) is pressed and a NOTE OFF message when the key is released.
With MIDI control changes, Mobius will treat a non-zero CC value as "on" and a zero value as "off". This is useful for some footswitches that cannot send MIDI notes.
MIDI Program Change messages are however not sustainable. There is no on/off state for a program change.
If you are just starting Mobius you do not need to fully understand sustainable triggers, except for one common problem. If you are using a MIDI controller that sends note or continuous control messages you must make sure that the controller sends messages when you press a switch and when you release a switch. This is usually called "momentary" mode. If your controller operates in "toggle" mode or if it does not send messages at all when the switch is released Mobius will not work correctly. The most common problem caused by this is pressing a switch to do the Record function and having the record continue for about 1/2 second then stop. See the Record Stops Suddenly item in the Troubleshooting section for more information.
A target is anything in Mobius that can respond to a Trigger. These include Functions, Controls, Parameters, Presets, and Setups.
For example triggers can be used to start and stop a function, to change the value of a control, or to select a preset.
A binding is the association of a Trigger with a Target. Once a binding is defined, every time a trigger is received it will be sent to the target.
A simple example is to bind the computer keyboard key 'R' to the function Record. Once this is done, every time you press R a recording will start or stop.
Most users will bind MIDI messages from a footswitch or control surface to functions and controls so they can operate Mobius without being near the computer.
In the user interface, bindings are performed several popup dialog windows for each trigger type. Just remember that while the user interface may be different they're all doing the same thing, associating a trigger with a target.
A Binding may be given a scope to more precisely specify which tracks will respond to the trigger. In this manual we will always assume the default global scope which means that triggers are sent to the currently selected track.
It is also possible to cause a trigger to be sent to a specific track even if it is not selected. This is an advanced topic that will be discussed in the Advanced Control section of the Exploring Mobius manual.
A sustain function is a special type of Function that can respond to a trigger twice, the first when the trigger is pressed and the second when the trigger is released. This can only be used with Sustainable Triggers.
One example is Sustain Record. With the normal Record function you tap a footswitch once to start recording and again to stop. With the Sustain Record function you press and hold the footswitch to start recording, and the recording stops as soon as you release the footswitch. Many functions have both normal and sustain versions, these will be displayed as different items in the UI.
If you bind a sustainable trigger to a non-sustainable function, the release event is simply ignored. If you bind a non-sustainable trigger to a sustainable function it will not work properly. The function may never turn off or it may begin its Long Press behavior.
Scripts always behave as sustainable functions and they can use the sustain time in powerful ways.
A long press happens when you use a Sustainable Trigger and you hold it in the "on" position for a certain period of time. By default this time is 500 milliseconds or 1/2 of a second.
When a long press happens, the function that was begun when the trigger was pressed may change what it does. This is called the "long press behavior". One example is the Record function. If you bind a trigger to the Record function and you hold that trigger down for 1/2 second, it will change into the Reset function and the loop will be erased and all layers lost.
Not all functions have long press behavior, if they do it will be highlighted in the documentation for that function, these are referred to as "long press functions". If a function supports long press, you must use a Sustainable Trigger in order to use it. If you use a long press function with a non-sustainable trigger such as a MIDI program change, the long press behavior will never activate.
A common problem that new users encounter is trying to bind the Record command to a trigger that sends a MIDI NOTE ON message but does not send a corresponding NOTE OFF message. This can happen with some footswitches. What happens is that the recording starts but within 1/2 second the loop resets. Mobius keeps waiting for the NOTE OFF but it never comes so it activates the long press behavior and resets the loop.
If this happens to you then it is almost always a problem with the footswitch. This problem is also common when you try to bind the Record function to a plugin host parameter if the host does not support the "momentary button" concept.
The Mobius window is divided into three areas. The button area at the top is where the configurable function buttons are arranged. The status area in the center contains many components that display the status of the current loop in the active track. The track strips at the bottom have controls and status indicators for each of the tracks.
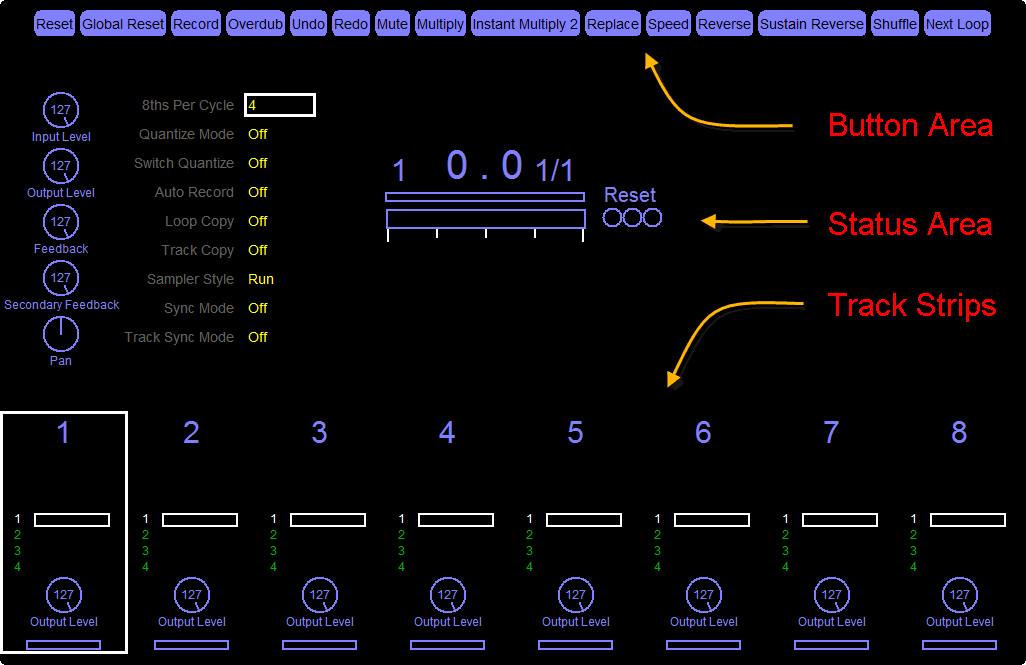
Each of these areas is highly customizable. You can remove things you don't want and add optional things that aren't shown here. In the status area you can move the components around to create alternate layouts that might look better to you. This ability to customize the display is one of the reasons why Mobius has a rather primitive appearance compared to most modern applications. Photo-realistic brushed aluminum faceplates with bouncing analog needles will not be found here.
In this manual we will only talk about the default user interface. See Customizing the User Interface in the Exploring Mobius manual for more information on changes you can make to the user interface.
Configuration of Mobius is performed using a set of popup dialog windows you open from the menus. There are several ways to access the menus depending on which operating system you use and whether you are running Mobius standalone or as a plugin.
In all situations, the Mobius menus are accessible when you right-click the mouse button somewhere inside the status area. A popup menu will appear near the current location of the mouse.
When Mobius is running standalone an application menu bar is also available. Under the Windows operating system, the application menu is displayed at the top of the Mobius window. Under the OS X operating system, the application menu is displayed at the top of the screen when the Mobius window is selected.
When Mobius is running as a VST or AU plugin, the application menu bar is usually not available. The one exception is under Windows when the Dual Plugin Windows option is enabled. In this case, Mobius is in full control over the window and adds a menu bar.
We will talk frequently about opening various configuration windows. These are all opened by first selecting Configuration from the main menu, then one of the submenu items that appear.
The button area may contain any number of buttons to perform functions and scripts. This can be convenient for infrequently used functions that you don't need have accessible from a footswitch. To perform the function simply click the button with the mouse. Buttons are Sustainable Triggers so you can use them with Sustain Functions. The function will begin when you press the mouse button and end when you release it.
Any number of buttons may be added. They will automatically be arranged on one or more rows in the button area. As you resize the Mobius window, the buttons will be rearranged to fit within the new window width. If you make the window narrower, more rows of buttons may be added. This will shift the status area down which may cause it to overlap with the track strips. If this happens you will need to make the window taller.
 |
| Multi-line button area |
See Customizing Buttons in the Exploring Mobius manual for more information on changing buttons.
The status area contains many components that display the state of the selected track. You can add or remove components and move them to new locations. Some components are initially invisible and will appear only when certain things happen in the track. To see the names and outlines of all active components, press and hold the Z key on the computer keyboard.
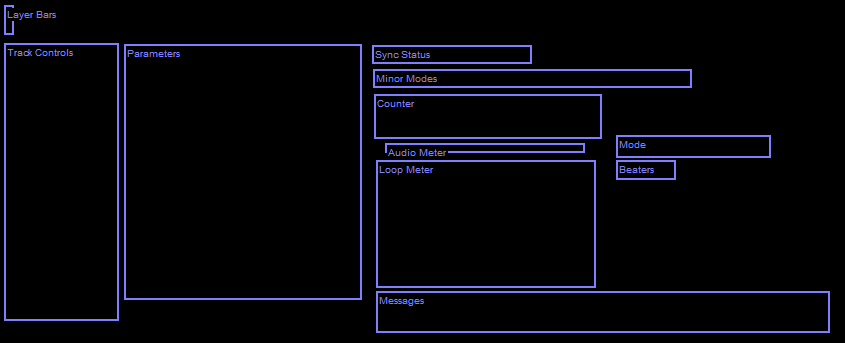 |
| Default status area component outlines |
As you add or move components in the status area you may notice that some of the components are erased with a black rectangular area. This indicates that one or more components overlap. When this happens you need to use Z to switch to outline mode, and drag the components so that they no longer overlap. To drag a component in outline mode, click over it with the left mouse button, hold the button down, and move the mouse to a new location.
Moving components is not necessary unless you customize them and sometimes after upgrading to a new release. See Customizing the Status Area in the Exploring Mobius manual for more information on changes you can make to the status area.
In the default layout, the Track Controls component is shown on the left edge of the status area. This component contains knobs to control levels in the currently selected track.
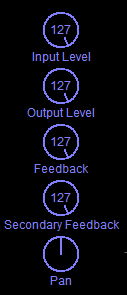 |
| Default track controls |
As you select different tracks the knobs will be redrawn to display the current levels in that track. To change the value of a knob, press and hold the left mouse button over the knob. To raise the value drag the mouse down or to the right. To lower the value drag the mouse up or to the left. Release the mouse button when the desired value is reached. See the Using Controls section for more information about what each of the controls do.
In the default layout, the Instant Parameters component is shown to the right of the Track Controls. This component displays the values of selected parameters and allows you to change them.
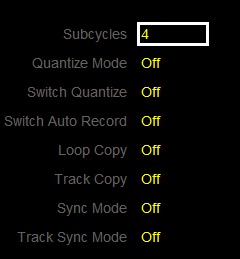 |
| Default instant parameters |
When using the default set of keyboard bindings, you can change the highlighted parameter using the 8 (up) and 2 (down) keys on the numeric keypad. Use the 6 (right) and 4 (left) keys to change the selected value. Changes you make here are not stored permanently in the preset, they temporarily override the value from the preset. The original preset value will be restored as soon as you select a different preset, or you perform a Full Reset.
You can change which parameters are displayed in this component, this is described in detail in the Visible Parameters section of the Exploring Mobius manual.
In the default layout, the loop status cluster is shown in the center of the screen. This is not a single component but a set of components that are often arranged to be near each other.
 |
| Default loop status components |
The counter displays several pieces of loop information including the active loop number, the current playback position within the loop, and the current cycle within the loop.
 |
| Example Counter |
On the left is a small number that displays the active loop number. Recall that a track may contain any number of loops, but only one can be active at a time.
In the center the larger digits show the current location in the loop in seconds. The digits to the left of the decimal point represent seconds, and the digits to the right represent tenths of a second.
On the right are two smaller numbers separated by a slash. The number to the right of the slash is the number of cycles in the current loop, the number to the left of the slash is the number of the cycle that is currently being played or recorded.
Cycles are created when you extend the loop using functions such as Multiply and Insert. Until you use those functions the loop will always have one cycle and the counter will always display 1/1.
The audio meter displays the level of the audio signal being received by the current track. It is a thin horizontal rectangle displayed between the Counter and the Loop Meter.
 |
| Audio meter showing the presence of a signal |
The audio meter will fill with color from the left to right as the signal becomes louder. The meter will usually flicker as the level changes. Note that the level displayed here is what mixing consoles call "post fader". It is the level of the track input after it has passed through the Input Level control and represents the level of the signal that will be recorded.
The loop meter is a very useful component that shows your current location in the loop using a graphical "thermometer". When you are at the loop start point, the loop meter will be empty. As the loop plays it will gradually fill with color until you reach the end point where the loop meter will be completely full. Then the meter is cleared and begins filling again.
 |
| Loop meter with a scheduled event |
To give you an even better idea of where you are in the loop, a series of tick marks is drawn under the loop meter. The longer marks represent cycles and the smaller marks represent subcycles.
When you use quantization functions may be delayed until some time in the future. When this happens an event is displayed under the tick marks with a small triangle showing when the event will happen. There may be several events scheduled to happen at the same time. In this example at the beginning of the 3rd cycle the loop will enter reverse mode and half-speed mode at exactly the same time.
If the event triangle points up it means the event will happen as soon as the loop meter reaches that point. If the triangle points to the right (or the left if going in reverse) it means the event will happen during a later repetition of the loop.
Recall that at any given time a loop is in a Mode, such as Reset, Record, or Play. The name of the current mode is displayed to the right of the Audio Meter.
 |
The names of the possible modes are described in the section Major Modes.
The beaters are a set of three "lights" that flash briefly when the loop playback position reaches certain important points.
 |
The first light flashes whenever a subcycle boundary is reached. The second light flashes whenever a cycle boundary is reached, and the third light flashes whenever the loop start/end point is reached.
Watching the beaters can help give you a sense of the loop rhythm if you are overdubbing over a non-rhythmic loop.
The Minor Modes component displays a number of interesting loop states. These differ from the major Modes because a loop can be in any number of minor modes at the same time. The minor modes are displayed in a line above the Counter.
 |
The possible minor modes are:
See the Minor Modes section for more information on what each of these modes means.
The Sync Status component is a small line of text displayed above the Minor Modes. When synchronization is enabled for the track, this component will display information the nature of the synchronization.
 |
If the Sync Mode parameter is set to Out and this is the MIDI sync master track, this will display the tempo of the MIDI clocks being generated.
If Sync Mode parameter is set to In, MIDI Beat, or MIDI Bar, the component will display the tempo of the MIDI clocks being received, and the number of the current beat and bar. Beat and bar numbers are guesses since MIDI clocks do not say what the time signature is. The way the counters work is every time we receive a MIDI start event we reset the beat and bar counters to 1. Then we start counting clocks, every 24 clocks is considered to be one beat. The number of beats in a bar is determined by the preset parameter named Record Beats/Bar. When this number of beats is received, we reset the beat counter back to 1 and increment the bar counter.
If the Sync Mode parameter is set to Host Beat or Host Bar, the component will display the tempo of the host transport as well as the current beat and bar number of the host transport.
The Message component is used to display messages from scripts and a few messages generated internally by Mobius. It is a large rectangular area normally positioned under the loop meter and above the track strips. Because this component is normally invisible you will need to press the Control-Z key (assuming you have the default key bindings) to see where it is.
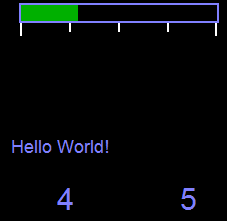 |
Whenever a preset is changed, Mobius will display the name of the new preset in the message area.
Scripts may use the Message statement to display a short message to let the user know what the script is doing.
Messages from scripts will be displayed for a few seconds then be erased. The amount of time a message is displayed can be controlled by the global parameter named Message Duration.
Using messages is an advanced topic that is primarily of interest to scripters. If you never intend to use scripts you can remove this component to save space, though this is not recommended since even non-scripters will often use scripts written by someone else.
The Layer Bars component is displayed just under the Button Area. It consists of a set of vertical rectangles or "bars" that resemble dominoes. The bars represent the Layers in the active loop. The layer bars are initially invisible. When the loop is recorded one layer is created and one bar is shown. As you modify the loop and create more layers, more bars are added. The bar for the current layer is shown in an brighter color than the other layers.
 |
| Layer bars before undo |
Until you use the Undo function, the current layer will always be the last one displayed on the right. When you use undo, you move backwards to the previous layers. Each time you press undo you move back one layer. The highlighted layer will appear somewhere in the middle of the list.
 |
| Layer bars after undo |
The component can be constrained to have a fixed number of bars. The default maximum number of layer bars is 10. A loop may have more layers than this, but only 10 bars will be displayed. Once the number of layers is greater than 10, a small number is displayed in the upper left corner. This number indicates the number of layers that are not being displayed on the left.
 |
| Layer bars with maximum bars and overflow counter |
A special layer bar is displayed if you use the Checkpoint function. A checkpoint can be used to collapsing a number of layers together if you don't care about the layers in between two checkpoints. When you use Undo and Redo you will move between checkpoints and jump over all the layers in between. A checkpoint layer is shown in a highlighted color different than the color used for the current layer.
 |
| Layer bars with a checkpoint |
The Loop Bars component displays the number of loops in the current track and highlights the one that is active. It displays loops using colored rectangles similar to the Layer Bars except that the rectangles are horizontal and stacked vertically.
 |
The loop bars component is not enabled by default because there are several other ways to show the current loop. The Counter displays the current loop as a number. There is also a graphical representation of the loops that can be displayed in the Track Strips that many people find more useful.
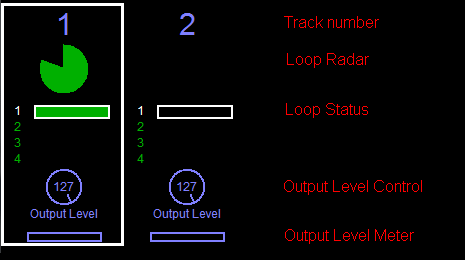
The Track Strips area displays summary status for all of the tracks. Each track has one track strip arranged in a row along the bottom of the window. The components in each track strip can be changed, but each strip will have the same components.
 |
| Default track strip |
The example above shows the default track strip components. Notice that the selected track will have a white rectangle drawn around its track strip.
The Track Number component will display either the track number or the track name that was defined in the Setup. When the track has focus lock the number or name will be displayed in a different color. Clicking on the number or name will toggle focus lock.
The Loop Radar displays progress through the loop as a pie-chart which is often lovingly referred to as the "loop pacman". When the loop is at its start point the radar will be empty, as the loop plays it will draw a clockwise filled arc. When the loop is at the end point it will display as a complete filled circle, then clear and start over.
The Loop Status component shows the status of each loop in the track. Each row represents one loop. If the loop has content a green rectangle is drawn. The active loop will be drawn with a white border. If you are performing a Loop Switch, the next loop will be drawn with a red border.
This knob controls the output level of the track, it is a duplicate of what is displayed in the Track Controls component in the status area. Being able to instantly access the output level control for all tracks makes it easier to mix them.
The Output Level Meter is similar to the Audio Meter except that it shows the level of the audio signal being played in the loop. It is another "thermometer" that will bounce around according to the average loop level being played.
While you can control Mobius with the mouse by clicking on buttons and dragging knobs, most users will want to control Mobius using a MIDI footswitch or some other form of MIDI control surface. The keys on the computer keyboard also provide a convenient way to control Mobius.
Recall from the Concepts section that a Trigger is an external stimulus that causes Mobius to do something. The most common examples of triggers are receiving MIDI events and detecting a computer keyboard key press. A Binding is the association of a trigger with a Target, the most common type of target is a function, script, or track control. By configuring bindings you can control almost every aspect of Mobius using MIDI or the keyboard.
Bindings are defined through a set of popup dialog windows. The windows for binding MIDI events, computer keyboard keys, and plugin parameters all share some components. The following image shows the binding window for MIDI events.
 |
| Example Binding Window |
The binding windows for MIDI events, keyboard events, and plugin parameters all use this style of user interface with a few differences that are described in later sections.
At the top are the Binding Set Selector components. This is displayed only in the MIDI binding window. The components here allow you to create several sets of bindings which may be activated at different times. The MIDI Bindings section describes these components in more detail.
On the left is the Bindings panel. This lists all of the bindings that are defined. The first column will have the name of the target, the second text representation of the trigger. The third arguments column is for use in a future release, for now it will always be blank.
On the upper right is the Targets panel where you select a target for binding. This is a tabbed panel with each tab containing the names of one type of target.
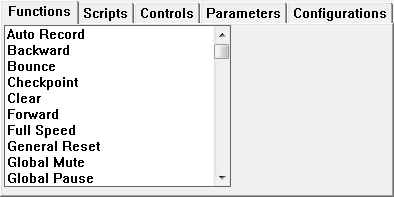
The Functions tab will have a list of all built-in functions arranged in alphabetical order. Function names that begin with Sustain are Sustain Functions and are normally bound to a trigger that has both a "down" and an "up" state such as MIDI notes.
 |
| Function Targets |
The Scripts tab will have a list of all loaded scripts. If you have not added any script files or directories from the Scripts configuration window then this tab will be empty.
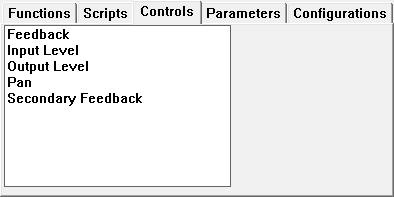
The Controls tab will have a list of all the built-in track controls. See Using Controls for more information on what these do. Control targets are almost always bound to MIDI continuous controllers.
 |
| Control Targets |
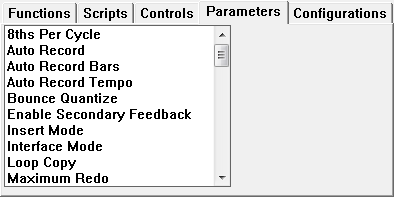
The Parameters tab will have a list of all the built-in loop and track parameters. Global parameters are not on this list.
 |
| Parameter Targets |
Parameter bindings are relatively uncommon, but one use for them is to bind a MIDI continuous controller to a parameter with a fixed set of values such as Quantize Mode. The MIDI controller range will be divided by the number of values in the parameter. With the MIDI controller at zero the first parameter value is selected, with the MIDI controller at 127 the last parameter value is selected. Other parameter values are selected as the MIDI controller sweeps between 0 and 127.
The Configurations tab will have a list of all the user-defined presets, setups, and extended MIDI bindings.
 |
| Configuration Targets |
The name of the configuration will be prefixed with Preset:, Setup:, or Bindings: to indicate what it is. The example above shows a few of each type. If you are running Mobius for the first time, you should see only one preset and one setup in the list named "Default".
Configurations are commonly bound to MIDI program changes though MIDI notes and computer keys may also be used. When this trigger is received the preset, setup, or binding set is made active.
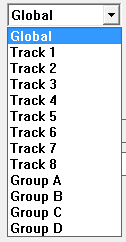
The Scope selector restricts the target to a particular track or track group. When the scope is Global the binding is performed in currently selected track, this is the most common binding scope. The scopes Track 1 through Track 8 force the binding to be performed in a specific track no matter which is currently selected. The scopes Group A through Group D force the binding to be performed on all tracks in one of the track groups.
 |
| Scope Selector |
The most common use for scoping is to assign different MIDI continuous controllers to specific track Controls such as Output Level. This is typically done with control surfaces that have groups of faders and knobs similar to a mixing console. Each group of faders and knobs can be scoped to a specific Mobius Track.
When you are just getting started we recommend you only use Global scope. The Advanced Control section of the Exploring Mobius manual has more detail on the use of binding scopes.
The Arguments text field is used for a binding feature that is still in development. It should always be left blank.
 |
| The Mysterious Arguments |
Between the Scope selector and the inscrutable Arguments are fields that define the binding trigger. These will change depending on the trigger type and are discussed in more detail in the sections below. This example shows the trigger fields for MIDI bindings.
 |
| MIDI Trigger Fields |
Under the Bindings panel are the Command Buttons which are used to create new bindings, update existing bindings, and delete bindings.
 |
| Command Buttons |
To create a new binding select a target, scope, and trigger and click New, a new binding will be added to the list. To delete a binding select it in the binding list and click Delete. To modify a binding select it in the binding list and notice that the target, scope, and trigger components change to have the values for the selected binding. Now change the target, scope, or trigger and click the Update button. The previous binding is changed to have the new values.
To create MIDI bindings, open the Configuration menu and select the MIDI Control item. The major sections of this window were described in Binding Popup Windows, here we will describe the features specific to MIDI bindings.
 |
| MIDI Binding Window |
The Trigger for MIDI bindings is specified with a set of three fields. The first is a menu that selects the type of MIDI event, the second the MIDI event channel, and the third the MIDI event value.
 |
| MIDI Trigger Fields |
The MIDI event type is specified with a menu containing these items.
The Channel field is used to select one of the MIDI channels from 1 to 16. The binding will only be executed if the MIDI event comes in on this channel. There is no omni mode, you must select a channel.
The Value field is use to specify the note number, continuous controller number, or program change number. It is a text field, you must type in the number.
To make it easier to create MIDI bindings, Mobius supports what is commonly called a "MIDI learn". The read-only text area below the Value field will show the MIDI events currently being received. To use this feature you must have previously selected one or more MIDI Devices. Just press keys or turn knobs on your MIDI controller and you should see them in the MIDI capture field. If you check the MIDI Capture box, the three trigger fields are changed to reflect the last MIDI event that was received. This makes entering the type, channel, and value for a MIDI binding much easier.
The typical steps for creating MIDI bindings are:
MIDI bindings are unusual in that you can create more than one set of bindings. The first set of bindings is always named Common Bindings and are always active. Additional sets of bindings may be optionally enabled and merged with the common bindings. These are called extended bindings and sometimes overlay bindings.
You might want to create several extended bindings if you have several MIDI controllers that you use at different times. Or to make different bindings for different locations such as a home studio and a performance space. This is an advanced feature, the majority of Mobius users only have a single set of MIDI bindings.
 |
| Binding Set Selector |
At the top of the MIDI binding window is the binding set selector The field at the top labeled Active Bindings is a menu containing all of the defined binding sets, the selected binding set is active. Note that this menu is a little confusing because the first binding set named Common Bindings is always active so you use this menu to select which binding set you want active in addition to the common bindings. If Common Bindings is selected here it means only the common bindings are active with no extensions. If anything else is selected it means that that binding set is active and it will be combined with the common bindings.
Below the active binding menu is a text field labeled Name which has the name of the binding set. The first binding set has no name, it is always displayed as "Common Bindings" and this cannot be changed. Extended binding sets may be given any name. When you first create them they will be given automatically generated names like "Bindings 1" and "Bindings 2". Edit the name field to set the preferred name.
To create a new extended binding set click the small New button to the right of the active bindings menu. A new empty binding set is created and added to the menu. To delete a binding set, first select it from the active bindings menu then click the small Delete button.
When you click Ok in the MIDI bindings window the extended binding set that is currently shown in the active bindings menu is made active. If you have been editing several binding sets be sure to leave the one you want to use now selected when you close the window.
After you create extended binding sets, the binding sets themselves may be bound to a MIDI event, when that MIDI event is received it causes that set to be activated. Binding sets will be shown under the Configurations tab in the target selector.
While several uses for multiple MIDI binding sets have been discovered by users, the original goal of this was to provide more flexibility for the Ground Control Pro foot controller. This controller has some nice features but one unfortunate design choice is that it can only be configured with 12 "instant access" buttons. An instant access button is what you must use if you want momentary switches that send something both when they're pressed and when they're released. The problem is that there are no "banks" of instant access switches like there are on other footswitches, you only get 12 of them and what they send cannot be changed without reprogramming.
To help work around this limitation you can create several extended binding sets that bind the same MIDI events from the instant access switches to different Mobius functions. In effect the binding sets become "banks" that reassign what the switches do. To switch between banks you then bind one row of switches (usually the top or bottom) to the binding sets themselves. For example switch 1 selects binding set A, switch 2 selects binding set B, etc. When set up in this way the top four switches are effectively bank select switches that change the behavior of the bottom 8 switches. This raises the number of Mobius functions at your disposal from 12 to 32.
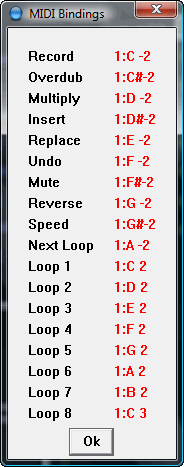
A window containing a summary of all the MIDI bindings may be displayed by pulling down the Help menu and selecting the MIDI Bindings item. This is a "modeless dialog" that you can leave open while you interact with the main Mobius window.
 |
| MIDI Bindings Summary Window |
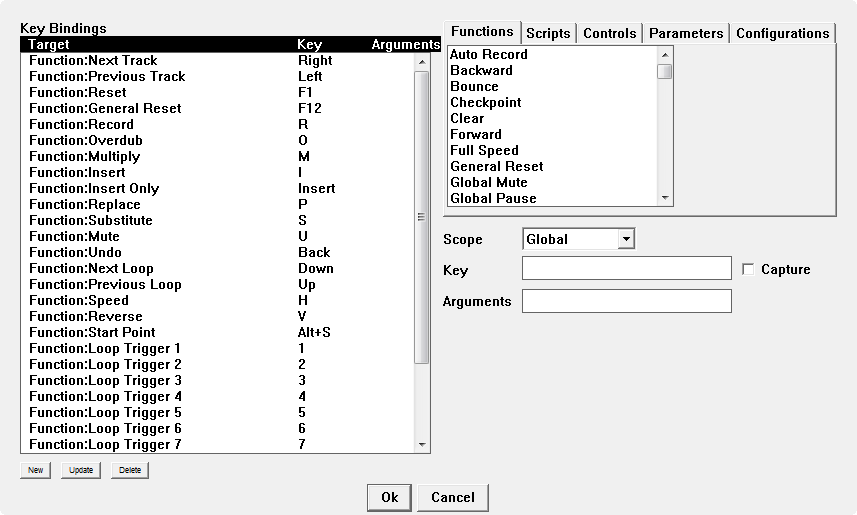
To create keyboard bindings, open the Configuration menu and select the Keyboard Control item. The major sections of this window were described in Binding Popup Windows, here we will describe the features specific to keyboard bindings.
 |
| Keyboard Binding Window |
The Trigger for keyboard bindings is specified with a single field labeled Key. This is a text field into which you type the name of the key you want to bind. The key names must follow certain rules, for example letters must be in upper case and control key combinations are written as "Ctrl+" followed by the key letter. It is possible to learn these rules but by far the easiest way to make key bindings is to check the Capture checkbox.
 |
| Keyboard Trigger Fields |
When key capture is checked, the name of any key you press, including combinations of shift and modifier keys, is automatically entered into the text field.
The Caps Lock key is not recognized as a shift modifier and cannot be bound. The Print Screen and Num Lock keys cannot be bound. The right Windows key may be bound, but cannot be used as a key modifier. The left Windows key may also be bound but it is not recommended since Windows will popup the start menu whenever this key is pressed.
The keys in the number pad will have different names depending on the state of the Num Lock key. If Num Lock is down, the keys will appear as "Num 0", "Num 1", etc. If Num Lock is up, the keys will be duplicates of the arrow and page keys. Keeping Num Lock down will provide you with more unique keys to bind. The keys in the number pad are different than the number keys in the row above the letter keys. For example, "1" and "Num 1" may be bound to different functions.
The typical steps for creating key bindings are:
Note that while it is possible to bind keys to track controls (Output Level, Pan, etc.) this is not normally done because keys cannot behave like continuous controllers.
Keys are however Sustainable Triggers so they may be used with the sustain functions. If the key is bound to a sustain function, the function is active for as long as the key is pressed.
A window containing a summary of all the keyboard bindings may be displayed by pulling down the Help menu and selecting the Key Bindings item. This is a "modeless dialog" that you can leave open while you interact with the main Mobius window.
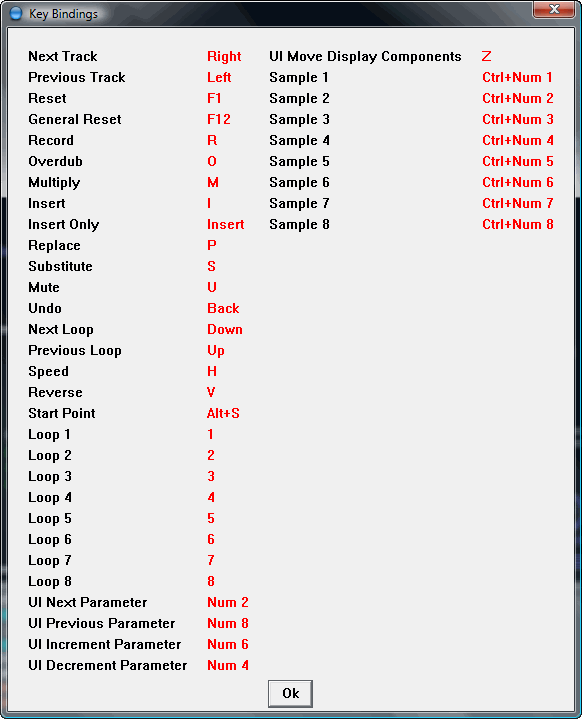 |
| Keyboard Bindings Summary Window |
In this section we will discuss some of the more common ways to use Mobius and describe some of the menu items and configuration windows. When you have finished this section you should have a good overview of what Mobius can do. The Mobius Techniques manual will go into more depth on functions and techniques. The Mobius Reference manual will have an exhaustive description of every function, parameter, control and variable.
Before we dive into Mobius functions, it is important to understand presets. Recall that Parameters are named values that can change how Mobius behaves. Many functions are sensitive to one or more parameters so in order to understand what a function does, you need to understand the parameters that may effect it and what the parameter values mean.
In this section we will not document what every parameter means, but we will show you how to change them. The Using Functions section will talk about how a few parameters are used with certain functions and the Common Parameters section will describe more parameters that are used with many functions.
Parameters are usually set by using Presets, a named collection of parameter values. You may define several presets with different parameter values. Each track always has one active preset. Presets may be changed at any time and each track can have a different preset.
To manage presets, open the Configuration menu and select the Presets item.
The preset window is divided into two sections. At the top are components for selecting, renaming, creating, and deleting presets. The large area at the bottom contains of a tab panel with the parameter values for the selected preset. The first tab labeled General has the most common parameters you will see referenced in the function documentation.
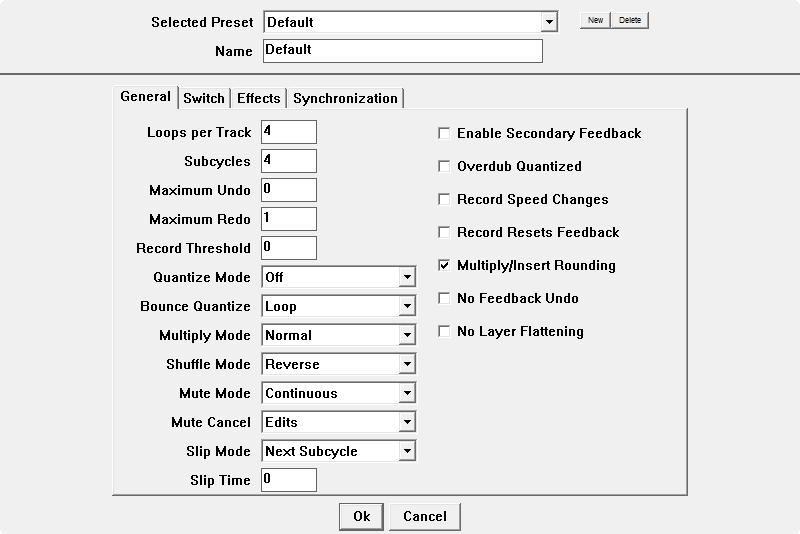 |
| Preset Window |
The Switch tab contains parameters that define what happens when you switch between loops.
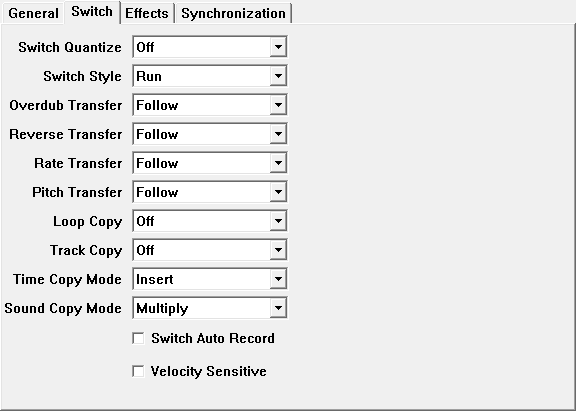 |
| Loop Switch Parameters |
The Effects tab contains parameters related to pitch and rate shifting.
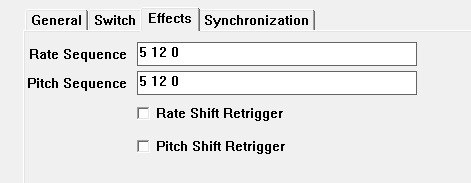 |
| Effects Parameters |
The Synchronization tab contains parameters related to loop and track synchronization.
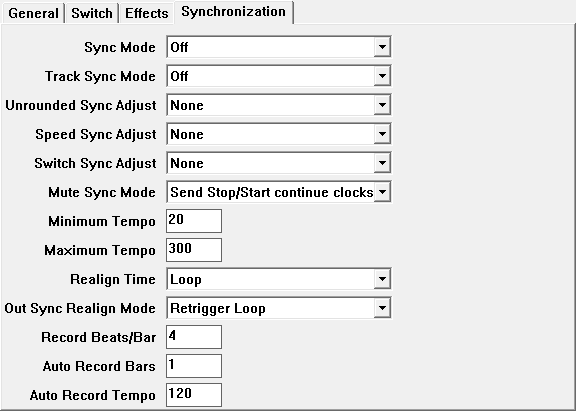 |
| Synchronization Parameters |
Parameter values are either numeric, text, boolean, or "enumerations". Numeric parameters are displayed with a small text field where you can type in a number. There is usually a minimum and maximum value defined for numeric parameters. Text parameters have a longer text field where you can type in free-form text. Boolean parameters are displayed with a checkbox to turn them on or off. Enumeration parameters are displayed with a menu where you select one of the allowed values.
When you see a parameter referenced in the documentation for a function and would like to try it out, bring up the preset window, locate the parameter in one of the tabs, change the parameter, and click Ok. Be careful though. Until you are comfortable with the basic operation of Mobius it is recommended that you not make changes to parameters unless you are certain about what they will do. If Mobius starts acting weird or if something that worked yesterday suddenly stops working, it is very often because you were experimenting with parameters and forgot to put them back to their default values.
Mobius installs with one default preset named oddly enough "Default". You can change this preset but if you're just getting started it is recommended that you make a copy of it and change the copy. That way you can always get back to the default parameter set if something goes wrong.
At the top of the preset window is a set of components that let you create, delete, select, and rename presets.
 |
| Preset Management Components |
To create a new preset simply click the New button. A new preset is created and selected. The new preset will have a copy of the parameters from the preset that was selected when you clicked New. If you want to make a new preset that is similar to an existing preset, be sure to select the right existing preset before you click New.
When a new preset is created it will be given a generated unique name starting with "Preset" followed by a number. To change this name, click on the Name text field and type in the desired name.
 |
| Renaming a new preset |
Once you have created several presets you can switch between them by using the Selected Preset menu at the top. The preset that is selected in this menu will become the active track preset when you click Ok on the preset window. If you are making changes to several presets, be sure to remember to select the one you want to be active before closing the window.
 |
| Selecting a preset |
To delete a preset simply select it and click the Delete button. The preset is deleted and removed from the selection menu. Be careful with the delete button, there is no "are you sure" prompt. If you delete a preset by accident click Cancel at the bottom of the preset window and open the window again.
After making changes to one more presets that you are happy with, you must click the Ok button. If you click Cancel or the window close button all changes you have made will be lost.
Another way to select presets is by using the Presets menu in the menu bar.
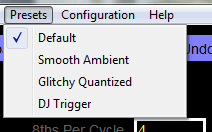 |
| Selecting a preset |
This menu will contain the names of all defined presets with a check next to the one that is active in the current track. To change presets simply select another one from the menu. If you just need to change presets without editing any parameter values using this menu is easier than opening the preset dialog.
Recall that a Function is a named action performed by Mobius at the request of the user. In order to make Mobius do anything you have to use functions. Several phrases are used to describe the act of using a function, we usually say "executing a function" though "running a function", "performing a function", and "triggering a function" are sometimes seen in forum conversation.
To execute a function you must associate it with a Trigger through a processed called Binding. In the initial installation there are a few functions bound to buttons in the UI and to keys on the computer keyboard. While you can use Mobius with just the computer almost everyone will at some point invest in a MIDI hardware controller, usually a footswitch. The Controlling Mobius section describes the most common ways to make function bindings.
In this section we focus on what the functions do and not on how they are executed. We will use the terms "press" and "release" when talking about using a trigger to execute a function. Sometimes the trigger will be referred to as "the button". The trigger may actually be a UI button, computer key, MIDI footswitch, or something else. But in all cases function triggers are normally buttons of some kind that can be pressed and released.
So instead of saying something technically accurate like "perform the down transition of a sustainable trigger bound to the Record function" we will just say "press Record".
When some functions are executed they will continue to have an effect on the loop until they are canceled. These are called modal functions while the function is active the loop is said to be in a mode. While the loop is in a mode some functions may change their behavior.
There are two types of modal functions: major modal functions and minor modal functions. The difference between these is that a loop can only be in one major mode at a time, but it may be in several minor modes at a time. If you are in a major mode and you use a function that has a different major mode, the first major mode is canceled.
If a function is not modal, it is said to be an instant function which means it has a one-time effect on the loop and then it is finished.
Reset and Instant Multiply are examples of instant functions. Record and Overdub are examples of modal functions.
A loop is always in one major mode which is displayed in the Mode component in the user interface. Most of the major modes are temporary and caused by the execution of a function. A few represent the basic states a loop can be in when no function is active. The possible major modes are:
A loop may be in any number of minor modes at the same time. Most of the minor modes are activated by the execution of a function, but some are related to synchronization and reflect various sync states a loop may be in once it has been recorded.
The Reverse, 1/2 Speed, Rate x, and Pitch x modes are called "effect" modes because they behave like applying audio effects to the track in real-time.
The Master, TrackMaster, and MIDIMaster are synchronization modes you will see after recording the track that has been designated the sync master track. TrackMaster means that it is behaving as the track sync master, MIDIMaster means that the track is behaving as the MIDI sync master, and just Master means it is both track and MIDI sync master.
Overdub is strange because it is both a minor mode and a major mode. Unlike other major modes if you start in Overdub mode then change to a different mode like Multiply when you leave Multiply mode you will return to Overdub mode. In effect the system always remembers if you started in Overdub mode and returns you there. This "pending" overdub mode is indicated by showing Overdub in the minor mode list.
The Reverse, 1/2 Speed, Rate x, and Pitch x, and Overdub modes may be active while the loop is in Reset mode. Even though the loop is empty, the minor modes are "armed" and will become active once you start recording a new loop.
There are two important states that a loop can be in but the terms used to describe those states are sometimes used inconsistently in the forums and even in the documentation. Usually it is clear from the context what the meaning is, but in this section we will give precise definitions for these terms.
When you first start Mobius, all loops are in a state called Reset. The loops contain nothing, they cannot be played or manipulated in any way until you record something into them. While the official term for this is Reset we sometimes use the term Empty to mean the same thing. An empty loop contains nothing.
When you use certain features like Empty Loop Action loops can be created that have a size but they do not contain any audible content. Loops in this state are said to be Clear or Silent.
The problem word is Empty. It is common to think of a silent loop as "empty" but technically this is not correct. The loop is not empty, it can play and be operated upon just like any other loop. It just doesn't have anything audible in it yet.
This is especially important in the discussion of "loop switching" with Next Loop and Empty Loop Action because "empty" loops will behave differently than "silent" loops.
It all starts with Record. When a loop is empty is said to be in a reset state. Unless you choose to work only with pre-recorded loops you must always begin by recording audio into an empty loop.
There are several ways to record loops but the one that most people start with is to use the Record function. You press Record once to begin recording and again to end the recording. Immediately after ending the recording the loop begins playing and continues forever until you modify it in some way.
Another function that can be used to record a loop is Sustain Record. With this function recording starts when you press Sustain Record and ends when you release it. This is especially useful if you want to create very short loops.
Some people like to have recording start automatically when they begin playing, then press Record to stop. You can do this by setting the Record Threshold preset parameter. When this parameter is zero, recording always starts immediately. When this parameter is set between 1 and 8, it the input level of the track must exceed the threshold before recording will start. Until then the track enters Threshold mode. Small values for the threshold will make it very sensitive, higher values will require a very loud signal. You will need to experiment with thresholds to find the one that works best for your input signal.
So now you've recorded a loop, how do you get rid of it? The Reset function will throw away the loop and return it to reset mode. You can bind a footswitch to the Reset function but if you are using a controller that supports Sustainable Triggers it is easier to use a Long Press of the Record function. Just press and hold Record for about 1/2 second and the loop will be reset.
There are three versions of the Reset function.
Once you have recorded a loop one of the most common looping techniques is to add more audio to the loop as it is playing, then when the loop plays back from the beginning you hear the original loop plus the new material. This process is called "overdubbing" and is done with the Overdub function.
As the loop is playing, press Overdub to begin overdubbing and press Overdub again to stop. You should hear what you overdubbed the next time the loop plays from the beginning. You can also overdub using the Sustain Overdub function. Like other sustain functions, the overdub starts when you press the button and ends when you release it.
If you do a lot of overdubs, the combined audio can reach the point of digital clipping and sound like harsh distortion. You may need to reduce the input level of the track so you can overdub several times without overloading.
Overdub is often used in combination with the Feedback control. If you reduce feedback and keep overdub on, you can create an endlessly evolving loop as old layers fade out and new overdubs take over.
Once you start overdubbing, you will notice bars being added to the Layer Bars in the user interface. Each bar represents one pass over the loop during which an overdub was applied. If you decide you don't like something you've overdubbed you can use the Undo function to return to the previous layer. You can keep using Undo to move back layers until you reach the first recorded layer.
If you have the Maximum Redo parameter set, then as you undo, the current layer will be moved to the redo list, displayed to the right of the highlighted layer bar. When you have one or more redo layers you can use the Redo function to move forward to the next redo layer.
A Reset of the loop will delete all layers.
Sometimes you want to silence a loop but not completely throw it away like the Reset function does. There are several ways to do this, the most common is to use the Mute function.
When you press Mute the loop will be silenced but it will continue to play. You will see the loop meter advancing but no sound will be output from the track. To end mute mode, press Mute a second time or use another function that is configured to end a mute (see below).
There are several options for what happens when you end a mute. These are controlled by the Mute Mode preset parameter. The possible values for this parameter are:
The last mute mode Pause actually changes the Mute function so that it behaves the same as the Pause function. Pause behaves like pause button on an old tape machine, when you press Pause the first time it freezes the loop, no sound is output and the loop does not advance. When you press Pause a second time it unfreezes the loop and continuous playback from the last location.
The most common way to end mute mode is to press Mute a second time. But other functions can be configured to automatically cancel mute mode without having to press Mute. This is controlled by the preset parameter Mute Cancel which has these values:
When you use the Custom mute cancel mode, you specify the functions you want to cancel with a global parameter. From the Configuration menu select Global Parameters, select the Functions tab then find the selector labeled Mute Cancel Functions. Move the functions you want to cancel mute to the panel on the right.
Note that another option for silencing a loop is to simply turn the Output Level down. If you bind a MIDI expression pedal to the Output Level control you can quickly sweep the track output level up or down using the pedal.
Often after recording a loop you would like to overdub something that is longer than the original loop. If you just use the Overdub function the overdub will "fold" over on itself rather than making the loop longer. The Multiply function is similar to Overdub except that it will extend the loop for as long as you are in multiply mode.
When you press Multiply for the first time you will enter the Multiply major mode. During this mode whenever you let the loop play for the length of one cycle, a new cycle is appended or inserted. Recording is active during the multiply so you may overdub new material over the cycles being multiplied.
It is important to understand that Multiply can behave differently if you use it again after the loop has been multiplied once. This behavior is determined by the Multiply Mode preset parameter which has these values.
The default multiply mode is Normal which makes it behave similar to the multiply function on the Echoplex EDP. We will not go into full detail on how multiply behaves but the most important thing to know is that if the loop has already been multiplied once, using it again will perform a "Remultiply" which can end up reducing the loop length as well as extending it. You can think of it like marking a region of text in a text editor and cutting it. When you use multiply in an already multiplied loop, the section of the loop between the beginning and the end of the multiply is cut out and the content on either side is discarded. A new layer is created containing only the section of the loop that was covered by the multiply.
Multiply behavior is complicated and difficult to understand for new users. If you do not already understand roughly how the EDP does multiply, it is recommended that you set Multiply Mode to Simple.
While the Multiply function is a "modal" function that you must start and stop, Instant Multiply will instantly multiply the current loop by some number. There are three built-in versions of instant multiple, more multiples are available using scripts.
The Divide function is similar to Instant Multiply but it works the other way, the loop is instantly divided by some divisor. There are three built-in versions of this function, more divisors are available using scripts.
The Replace function is similar to what recording systems call "punch in". While the replace function is active, the previous contents of the loop are erased and replaced with the audio signal currently being received by the track.
Replace is a modal function, the replace begins when you press the button for the first time and ends when you press the button a second time. It is fun to use Replace with the Quantize Mode parameter set to Sub Cycle. This allows you to create punches that follow a strict rhythm.
The Insert function will insert new material into the loop. Unlike Replace it does not overwrite the existing loop, instead it makes the loop longer by inserting space at the beginning, middle, or end of the loop. Insert is a modal function, the insert begins when you press the button the first time and ends when you press it a second time.
Insert will normally "round off" so that a full cycle is inserted. When you press Insert a second time, an event to end the insert is scheduled for some time in the future, and Insert mode will continue until that time is reached. This is useful if you want to create rhythmic loops and think of cycles like one or more measures in the time signature.
If you want to create non-rhythmic or "glitchy" loops you can create an "unrounded insert" by ending insert mode by pressing the Record button rather than the Insert button.
The Reverse function will toggle the playback direction. This is a minor modal function, reverse starts when you press the button the first time and ends when you press the button a second time. But unlike major modal functions you can be in reverse mode at the same time you are in other modes like Multiply or Overdub. Changing direction as you overdub can result in some very interesting effects.
While you are in reverse mode, the word Reverse will appear in the Minor Modes Component in the user interface. You will also see the Loop Meter and Loop Radar draw in reverse.
The Reverse function will toggle half-speed mode. This is a minor modal function, half-speed starts when you press the button the first time and ends when you press the button a second time. Like Reverse, minor modal functions can be active at same time you are in other modes like Multiply or Overdub. You can even have Speed and Reverse active at the same time.
While you are in 1/2 speed mode, the word 1/2 Speed will appear in the Minor Modes Component in the user interface. You will also see the Loop Meter and Loop Radar draw more slowly and in a different color.
A common use for the Speed function is to record something while in half-speed mode, then when you return to normal speed what you recorded plays twice as fast and one octave higher. Speed (like Reverse) can be used while the loop is in Reset mode. Although the loop is empty you will see "1/2 Speed" appear in the in the Minor Modes Component. This means that 1/2 speed is "armed" and will be active when you eventually record the loop.
The Next Loop function will move to the next loop in the track. This is a rather complex process called loop switching. Many things can happen when you switch loops, these are discussed in more detail in the Mobius Techniques manual.
For now you can experiment with using Next Loop to record different loops, then cycle over them. As you will see, with the default preset parameters, switching to an empty loop halts playback and the next loop sits in Reset mode until you press Record to begin recording. Trying to create another loop that is the same size as the first "by ear" is also next to impossible.
There are many options for creating new loops that don't disrupt the flow of the performance. One is to set the Empty Loop Action parameter to Record. If this is set, whenever you switch to an empty loop, recording begins automatically. You do however still need to press Record to stop the recording.
To create loops that are exactly the same size, or an exact multiple, set Empty Loop Action to Copy Timing. Now when you switch to an empty loop, a new clear loop will be automatically created that is exactly the same size as the original loop. You can then begin overdubbing into this new loop.
Next Loop is just one of many functions that perform loop switches.
Previous Loop works the same as Next Loop but it selects the loop in the other direction. The numbered Loop functions cause a switch to a specific loop.
The Sustain Next Loop and Sustain Previous Loop functions must be bound to a Sustainable Trigger. If they are not, they behave the same as Next Loop and Previous Loop. What the sustain functions do is switch to the new loop for as long as the function button is held down, then return to the original loop.
The Retrigger function retriggers the current loop. It doesn't sound like it would be a loop switch function but it is essentially a switch away from and then immediately back to the current loop. All of the features that are available when switching to a different loop are also available with Retrigger. The numbered Loop functions are similar. If you are not in the numbered loop, then it switches to that loop. If you are already in the numbered loop then it does the same thing as Retrigger.
Shuffle is a fun function you can use to slice a loop into pieces then reorder them. This is an "instant function" that will have immediate effect on the loop rather than placing you into a mode. When the Shuffle button is pressed all of the subcycles of the loop are immediately arranged. You can change the granularity of this slicing by changing the Subcycles parameter.
How the slices are rearranged is controlled by the Shuffle Mode parameter. It has these values:
With Reverse the slices are arranged in reverse order. For example starting with slices 1234 the new order will be 4321.
With Shift the slices are shifted to the right by one. For example 1234 becomes 2341.
With Swap pairs of slices are reversed. For example 1234 becomes 2143.
With Random the slices are reordered randomly.
A control is a named value that controls how audio is recorded and played in a track. Controls are similar to Parameters but their values are always integers and have a larger range than most parameters. They are usually set by a MIDI device that sends continuous controller messages such as a rotating knob or a foot pedal.
 |
| Default track controls in the status area |
Input Level controls the amount of attenuation (volume reduction) applied to the audio stream coming in from the audio interface or the plugin host. A value of 127 means that the audio is unmodified. Lowering the value attenuates the audio using an approximate logarithmic curve. Usually input level is left all the way up, but you may want to reduce it if you have different instruments routed to each track and you want to balance their input levels.
Output Level controls the amount of attenuation applied to the track output as it is sent to the audio device or plugin host. Like Input Level a value of 127 means the is passed unmodified. Output levels are frequently changed to balance the track mix. Functions that add new material to a loop such as Overdub can cause a loop to become progressively louder. After several overdubs it may be necessary to reduce the output level to match the other tracks. Output levels are also commonly changed as an effect, such as temporarily muting tracks or performing a gradual fade in or fade out.
Feedback controls how the loop decays over time. With feedback set at 127 the loop does not decay, it will play that way forever or until you change it with looping functions. With feedback reduced the loop will gradually become softer every time it plays until it eventually decays to silence. A common looping technique is to use Overdub with feedback reduced. You can keep adding new layers to the loop but old layers will decay. In this way you can create evolving loops that change gradually over time.
Secondary Feedback is like Feedback except that it is active at different times. It must be enabled by selecting the Enable Secondary Feedback preset parameter.
For more on using feedback see the section Using Feedback.
Pan adjusts the relative output levels of the left and right channels of the track.
In the Using Presets we described how you can change parameters and in the Using Functions we introduced a few parameters and showed how they are used with certain functions. In this section we will introduce a few more of the most commonly used parameters. The Mobius Techniques manual has more information on each of these parameters and how they can be used.
The Loops per Track parameter determines how many loops will be in the track. The default is 4, the minimum number is 1 and the maximum is 8.
Note that since this is a preset parameter, and since each track can have a different preset, it is possible for each track to have a different number of loops. This can be useful when done carefully, but when you're just starting out it is recommended that you make all tracks have the same number of loops to ensure that functions like Next Loop and Loop Trigger work consistently.
Bug Alert: There are some glitches in the user interface when you change the Loops per Track parameter and the Loop Status component is selected in the track strip. Since this component displays a row for each loop if you increase the number of loops this component will need to grow taller which makes the entire track strip taller. Currently the track strip will not automatically resize to show the additional loops, you must close and restart Mobius to rebuilt the track strips with the new size.
Recall that Quantization is a general term used to describe how Mobius can adjust the timing of a function so that it begins or ends at a precise point in the loop. The Quantize Mode parameter is the primary way to enable quantization for most functions.
Not all functions obey quantization and some like Overdub have other parameters that determine whether they are quantized. But most do, so if you feel like functions are not happening when you want them too then quantization is probably enabled.
The parameter may have these values.When Quantize is Off quantization is disabled. Functions start immediately and usually end immediately. Some functions like Multiply and Insert have their own rounding behavior and will sometimes defer their ending even when quantization is off.
When Quantize is Subcycle, Cycle, or Loop quantization is said to be enabled. The three values define what are called the "quantize points" or "quantization boundaries". When quantization is enabled and a function that obeys quantization is executed, the execution is delayed until the next quantize point.
When Quantize is Loop the quantization point is the beginning of the loop (or the end depending on how you look at it). Functions are delayed until the loop plays to the end and wraps back around to the start point.
When Quantize is Cycle the quantization points are at the beginning of each cycle. Until you use functions such as Multiply that add cycles, a loop will have only one cycle and this quantize mode behaves the same as Loop. If you have cycles, you will see them in the Loop Meter as longer tick marks.
When Quantize is Subcycle the quantization points are at the beginning of each subcycle. A subcycle is an even division of the cycle and is determined by the Subcycles parameter. Depending on how you build the loop, subcycles are often the same as "beats" and cycles the same as "bars" in a time signature. But this does not have to be the case, cycles and subcycles can represent any span of time.
Though it is not a hard rule, in general most people use cycles to split the loop up into a relatively small number of major sections. These might be bars, phrases, or even one full chord progression. Dividing these into subcycles is then a matter of preference, the subcycles may represent beats, bars, or even finer grains like 8th or 16th notes.
The point of using quantization is to make changes to the loop at rhythmically exact times. This is often used when you are synchronizing with an external device such as a drum machine or sequencer. For example you may want to enter Reverse mode at the exact moment the loop reaches the start point. Or you may want to use Replace to punch in notes on a precise quarter note grid.
The Subcycles parameter sets the number of subdivisions in each cycle. This is used most often with the Quantize Mode parameter to define quantization points. You can see subcycles in the Loop Meter as the shorter tick marks.
While the number of cycles in a loop stays the same until you extend or shorten it, you can change the number of subcycle divisions at any time just by changing the Subcycles parameter. You will see the subcycle tick marks in the Loop Meter change but otherwise the loop is unaffected.
As mentioned in the Quantize Mode section, not all functions obey quantization. One of these is the Overdub function. The reason is that usually you want more flexible control over when overdubs begin and end, and since overdubs merge with the existing loop the exact start and end points are not as important rhythmically.
There may be cases though where you want overdubs to be quantized. If for example you are overdubbing into an empty loop you might want to make an exact grid of quarter notes similar to what you can accomplish with the Replace function. It is possible to make Overdub sensitive to quantization by checking the Overdub Quantized preset parameter. This parameter applies only to Overdub and dependent on Quantize Mode parameter. If Overdub Quantized is checked but Quantize Mode is Off, the Overdub function will not be quantized.
Loop switching is a very powerful operation with many options. Because so much can be done during a loop switch it is given it's very own quantization mode set using the Switch Quantize parameter. The various loop switching functions described in Next Loop do not obey the Quantize Mode parameter, they will only obey the Switch Quantize parameter.
Switch Quantize is similar to Quantize Mode but has a few extra values:
When the value is Off the switch happens immediately.
When the value is Subcycle, Cycle or Cycle the switch happens at the next quantization point. When you use one of the loop switch functions the loop will enter Switch mode while it waits for the next quantization point.
The three "Confirm" modes require an extra confirmation action before the switch will happen. When you use one of the loop switch functions the loop will enter Confirm mode. To exit confirmation mode press the Undo button. What happens now is determined by the combination of the confirmation option and the quantization point. If the value is Confirm the switch happens immediately, if it is any of the other three the loop enters Switch mode and waits for the next quantization point before doing the switch.
While the loop is in Switch or Confirm modes you can execute other functions to control what happens to the next loop when the switch is eventually performed. This is sometimes referred to as the "switch quantization period" and more casually on the forums as the "lame duck period".
This is a complex topic that is described fully in the reference guide. But here are a few examples of functions you can use during the switch quantization period.
You can press any number of functions during the switch quantization period. In the Loop Meter You will see them "stack" under the switch quantization point. This is referred to as "function stacking". Some stacked functions are simply queued for execution after the loop switch, similar to normal quantization. Other functions have special behavior when they are stacked, Overdub for example does not simply turn on overdub mode in the next loop, it performs a sound copy from one loop to the next.
The Empty Loop Action parameter is used when switching to a loop that is "empty" or in Reset mode. If Empty Loop Action is Off nothing happens and the track usually enters Reset mode waiting for you to record something in the empty loop.
If Empty Loop Action is set to Record, the Record function begins immediately.
If Empty Loop Action is set to Copy Timing, a new silent loop is created that has the same length and number of cycles as the original loop. This is a very useful option for creating several loops that are exact multiples of each other. This is important if you want to maintain a steady rhythm as you switch between loops. Once the silent loop has been created you can then use Overdub or Multiply to add audio content.
If Empty Loop Action is set to Copy, the current loop is copied entirely to the next loop. Again this is useful to create loops that will play in rhythm. Copying the sound in addition to the timing can be useful if the original loop has a simple backing rhythm that you want to carry over and then overdub something on top of.
The Switch Location parameter determines where the playback position will be after you switch to another loop. The values are:
When using Follow, if the new loop is smaller than the current loop the playback position may need to be "wrapped" so that it fits within the new loop. For example if the current loop is 6 seconds long and you are currently at the start of second 5, then you switch to a loop that is 3 seconds long, the new loop location will be at the start of second 2.
When using Restore, if the new loop has never been played the location will be at the start. If you are using one of the methods to perform a sound copy or a timing copy (see Empty Loop Action) then the location will not be restored.
The Switch Duration parameter determines how long you will stay in the new loop after a switch. The values are:
Once when combined with a Switch Location of Start makes the loop triggering functions behave similar to a sampler. The loop starts from the beginning, plays once, then stops (enters mute mode).
The Sustain option requires that the function be bound to a Sustainable Trigger. If it is not, then this option behaves the same as Once.
The Sustain Return option also requires a sustainable trigger. If it is not, then this option behaves the same as Permanent.
Recall from the Next Loop section that there are two functions that always have sustained switching behavior, Sustain Next Loop and Sustain Previous Loop. These two functions do not use the Switch Duration parameter. They will always return you to the original loop when the sustain ends (subject to the Switch Quantize parameter).
The Enable Secondary Feedback parameter is a boolean that is either on or off. When on, the Secondary Feedback control is enabled while in a certain recording modes. These include Overdub, Multiply, Stutter, and Substitute.
See the Using Feedback section for more about how feedback can be applied.
The Record Threshold parameter determines how loud an audio signal must be before a new loop can be recorded. It is relevant only for the Record function. With a default value of 0, recording begins immediately after you press the Record button. When set to a value from 1 to 8, recording will be delayed until the input signal reaches a certain level.
This parameter is useful if you would rather start recording automatically as soon as you begin playing an instrument rather than having to coordinate your playing with a press of the Record button. It should be noted though that it can take some experimentation to get the threshold level set correctly for your playing style. Many people find it easier to create loops with the correct timing by manually pressing the Record function. But if you play an instrument with a sharp attack and there is little background noise, threshold recording may work for you.
Feedback controls how the loop decays over time. With feedback set at 127 the loop does not decay, it will play that way forever or until you change it with looping functions. With feedback reduced the loop will gradually become softer every time it plays until it eventually decays to silence. A common looping technique is to use Overdub with feedback reduced. You can keep adding new layers to the loop but old layers will decay. In this way you can create evolving loops that change gradually over time. This style of feedback is popular for "ambient" looping.
At the extreme setting of zero, loops will play once then the loop will be empty. Low feedback settings can be used to achieve effects similar to using a digital delay, loops will play a few times then be silent.
Feedback can be kept at a fixed level or it may be dynamically controlled with a MIDI expression pedal. By dynamically sweeping feedback up and down you can sculpt the previous layers so they fade in and out under your control.
You may wish to have different feedback levels when the loop is playing and when it is being modified through functions such as Overdub. For example, you may want old layers to decay when the loop is playing, but while you are overdubbing you want the old layers to not decay. Alternately you may want the old layers to not decay when a loop is playing, but have them decay while you are overdubbing. This can be achieved through the use of Secondary Feedback.
To enable secondary feedback you must check the Enable Secondary Feedback parameter in a preset. When enabled, the Secondary Feedback control will be used to set the feedback when in certain editing modes. By default the modes obeying secondary feedback are Overdub, Multiply, Stutter, and Substitute.
You can control which modes will obey secondary feedback by setting a global parameter. From the Configuration menu select Global Parameters, select the Modes tab and locate the selector labeled Modes Ignoring Secondary Feedback. By default the listed modes will use secondary feedback. You can disable secondary feedback for certain modes by moving them to the panel on the right.
Each Mobius track is an independent stereo looper. They can all record and play audio and are mixed together with output level and pan controls. Tracks play simultaneously but you can use functions like Mute or Pause to silence them. Many synchronization options are available to record tracks that stay in perfect sync with other tracks.
NOTE: If you have several loud tracks playing at the same time, it is easy to cause digital clipping when the track outputs are summed and sent to the audio interface. This sounds very nasty. Mobius is not smart about compression. If you experience this, turn down the output level in one or more tracks.
Tracks are visually represented with a row of track strips at the bottom of the main window. There is always one selected track that is indicated by a white border around its track strip. You can change the selected track by clicking within its track strip, by using the left or right arrow keys, or by using one of the track selection functions. The selected track has input focus which means that it will respond to buttons in the Button Area, MIDI commands, or keyboard keys.
To make a track do things you will usually configure them to respond to MIDI events through a process called binding. See the Controlling Mobius section for more information on how to create bindings.
There are many ways to use tracks, a few of the more common techniques are:
In this section we'll describe the most common use for tracks: recording and mixing a set of background rhythm tracks for soloing. The Mobius Techniques manual will discuss some of the more advanced uses of tracks.
Note that the steps described here assume that you have not made changes to the track setups. Setups are an advanced topic that are not described in this manual so this isn't a problem if you're installing Mobius for the first time. But if you're an experienced just make sure that all tracks are set to use the same preset and they all receive on the same port.
Start by making sure you can record a loop into the first track then reset it. Verify that you can click the mouse in the track strip to select tracks, or select them using the left and right arrow keys.
Next enable track sync. Open the Preset window and click the Synchronization tab. Locate the Sync Mode parameter and set it to Off. Locate the Track Sync Mode parameter and set it to Loop.
Select track 1 and record a simple rhythm part for a few seconds. The first track you record becomes the track sync master track for all other tracks. Listen the first track and watch the loop radar. When the master is at the very beginning of the loop the loop radar will be blank and the loop is said to be at its start point.
Now select track 2 and get ready to play a bass line. Wait until the master track is near the middle of its loop and press Record. It doesn't matter exactly when you press Record as long as you press it before the master track start point.
Track 2 will now enter Synchronize mode. It is ready to record but the recording will be delayed until the master track reaches the next track synchronization point. Since Track Sync Mode was set to Loop the synchronization point is the start point of the loop. As soon as the master track reaches the start point, track 2 will change to Record mode and you can begin playing the bass line.
Sometime during the recording of track 2, press Record again. You will see the event marker Record Stop appear at the end of the Loop Meter in the center of the window. This is a pending event marker which means that the recording is waiting for something before it can stop. In this case it is waiting for the master track to reach its start point. Continue playing the bass line. As soon the master track reaches its start point Record mode will end and Play mode will begin. Track 2 will begin playing the bass line loop in sync with the rhythm loop in track 1. If you're not satisfied with the result use Reset and start again.
Continue this process to record other tracks. Experiment with the output level and pan controls. When you are ready to start over use the Full Reset function to reset all tracks at the same time.
Note that if you are doing a track sync recording and you let the master track play beyond its start point before you press Record a second time, the recording will be delayed until the master track reaches its start point again and the new loop will be twice as long as the master loop. This often desirable if the master track is short and you want to record another track that is an exact multiple, such as 4 times as long.
Scripting is a very powerful feature that lets you customize the way Mobius behaves. We will not describe how to write scripts in this manual, but we will show you how to use the scripts you might find posted in the forum or in the old Yahoo group files. For a complete discussion of writing scripts see the Mobius Scripting manual.
Scripts are simply text files that can be written or viewed in any text editor. It is critical though that they be stored on your file system as plain text files, not converted into word processor files. There are also several "encodings" that can be used with text files, it is important to select ones that Mobius can use.
If you are using Notepad on Windows, you must save the file using the ANSI encoding, you must not use Unicode. If you are using Wordpad, in the Save as type: menu you must select either Text Document or Text Document - MS-DOS Format.
If you are using TextEdit on a Mac, you need to save the file in a plain text encoding, either Western (Mac OS Roman) or Western (Windows Latin 1). When you use the Save As menu item, if you see a File Format: menu with items like Rich Text Format or Web Page (.html) then you are editing the file using rich text rather than plain text. Open the TextEdit Preferences window and under the New Document tab select the Plain Text radio button under the Format section. Once you do this create a new document and the Save As window should show a Plain Text Encoding: menu, select Western (Mac OS Roman).
There are many text editors available that present encoding options in different ways or using different words. The presentation may also be different on different versions of the operating system. The main thing to keep in mind is that you must always pick the simplest text format available, usually this is referred to as "plain text" with encodings such as "ansi", "latin 1", "roman", or "MS-DOS". Stay away from anything that says "rich" or "unicode" or that looks like a word processor format.
Though it isn't always required, it is recommended that you name script files using the extension ".mos".
Once you have created the script file, you need to tell Mobius about it through a process called script registration. There are two ways to register scripts: by file and by directory. When you register a script file, that file is loaded into Mobius when it starts. If you register a script directory, all scripts in that directory are loaded. Registering script directories is convenient if you have a lot of scripts and you don't want to register all of them one at a time. You do need to be careful though to only put things in this directory you really need.
To register a script open the Configuration menu and select Scripts, the Script Registration window will open.
On Windows you will see Add Script and Add Directory buttons that will bring up standard selection dialogs for files or directories. On Mac you will see a similar window but it will only have a single Add button because the standard Mac file selector lets you select both files and directories.
To register a new script or script directory, click one of the add buttons, navigate to the file or directory you want to register and click Open on Windows or Choose on Mac. The name of the file or directory should now appear in the list in the center of the script registration window. If you want to remove an item from the list, click on it so that it becomes highlighted then click the Delete button. Finally click the Ok button at the bottom of the widow to save the changes. The new set of scripts will be loaded into Mobius and are available for binding.
See the Controlling Mobius for a full description of how to associate triggers like MIDI foot switches to scripts. Once you have registered some scripts or script directories you will start seeing their names in the Scripts tab of the binding windows.
Note that scripts will usually appear in the binding windows with a name other than the raw file name. Most scripts include a line starting with !name at the top that specifies a user friendly name you want to see in the binding windows. For example:
!name Global Fade Out
A typical script file may have a name like "fadeoutall.mos" but the name you see in the binding windows might be "Global Fade Out" or something else more meaningful than the file name. You will need to look in each script to see if it contains a !name line and remember to look for that name in the binding windows. If the script doesn't have a !name line you will just see the name of the script file without the ".mos" extension.
This manual has given you an overview of Mobius user interface and some of the more common ways to use Mobius. Experiment with what you have learned then proceed to the Exploring Mobius manual for information about more advanced features.
In this section we will discuss a few commonly encountered problems and suggest ways to solve them.
If you press a button that has been bound to the Record function and the record runs for about 1/2 a second then stops and resets the loop, you are not using a properly programmed Sustainable Trigger.
The Record function has Long Press behavior, if you press and hold the button bound to the Record function longer than 1/2 second, it will execute the Reset function. To prevent this from happening you must use a trigger that sends a message both when the button is pressed and when it is released. Usually this means that your footswitch must be programmed to send MIDI notes or MIDI continuous controller messages on both the up and down transitions. If your MIDI footswitch sends a MIDI Note On message when it is pressed but does not send a MIDI Note Off message when it is released, Mobius will think the button is being held down and will reset the loop.